Hobie Getaway Spinnaker
Last summer I installed a spinnaker on my Hobie Getaway. I'll start off by saying that sailing with a spinnaker is super fun. It is challenging and rewarding.
Installing the spinnaker pretty strait forward, but the instructions provided by Hobie are basically useless. The Spinnaker kit is basically the hobie 16 kit with a few extra parts. Fortunately I got a great installation guide written by OttawaDave on the Hobie forums. I thought it might be useful to post the Hobie Getaway spinnaker instructions here.
Hobie Getaway Spinnaker Install Instructions
To install this kit I recommend getting a very good pop rivet gun. The stainless steel rivets are much more difficult to pop then the aluminum rivets from the hardware store. Get yourself one of these.

It took me about 4 hours to complete the install and I didn't get he spinnaker hound mounted as nicely as I would have liked. Here is what the boat looks like with the spinnaker flying.

Full Instructions (reproduced below for easy reading; originally written by OttawaDave, updated 2012-09-25):
SECTION A: INTRODUCTION
This unofficial set of installation instructions was written for a 2009 Hobie Getaway, using a 2012 Hobie Spinnaker Kit 20999020.
Note from the Author: I had never seen this kit before, but with email advice and pictures from three very helpful people, I installed this kit. I drafted these instructions before installation, but this version is after installation, and after sailing with the spinnaker. hall@sandkasel.com
SECTION B: PARTS LIST
1. Spinnaker snuffer bag (black) (Part # ST1007324) - Qty 1
2. Spinnaker snuffer bag ring (black) - Qty 1
3. Sail - Qty 1
4. Sail bag - Qty 1
5. 6mm / 5.5m spinnaker tack line - Qty 1
6. 5mm / 21m spinnaker halyard line - Qty 1
7. 8mm / 12m spinnaker sheet line - Qty 1
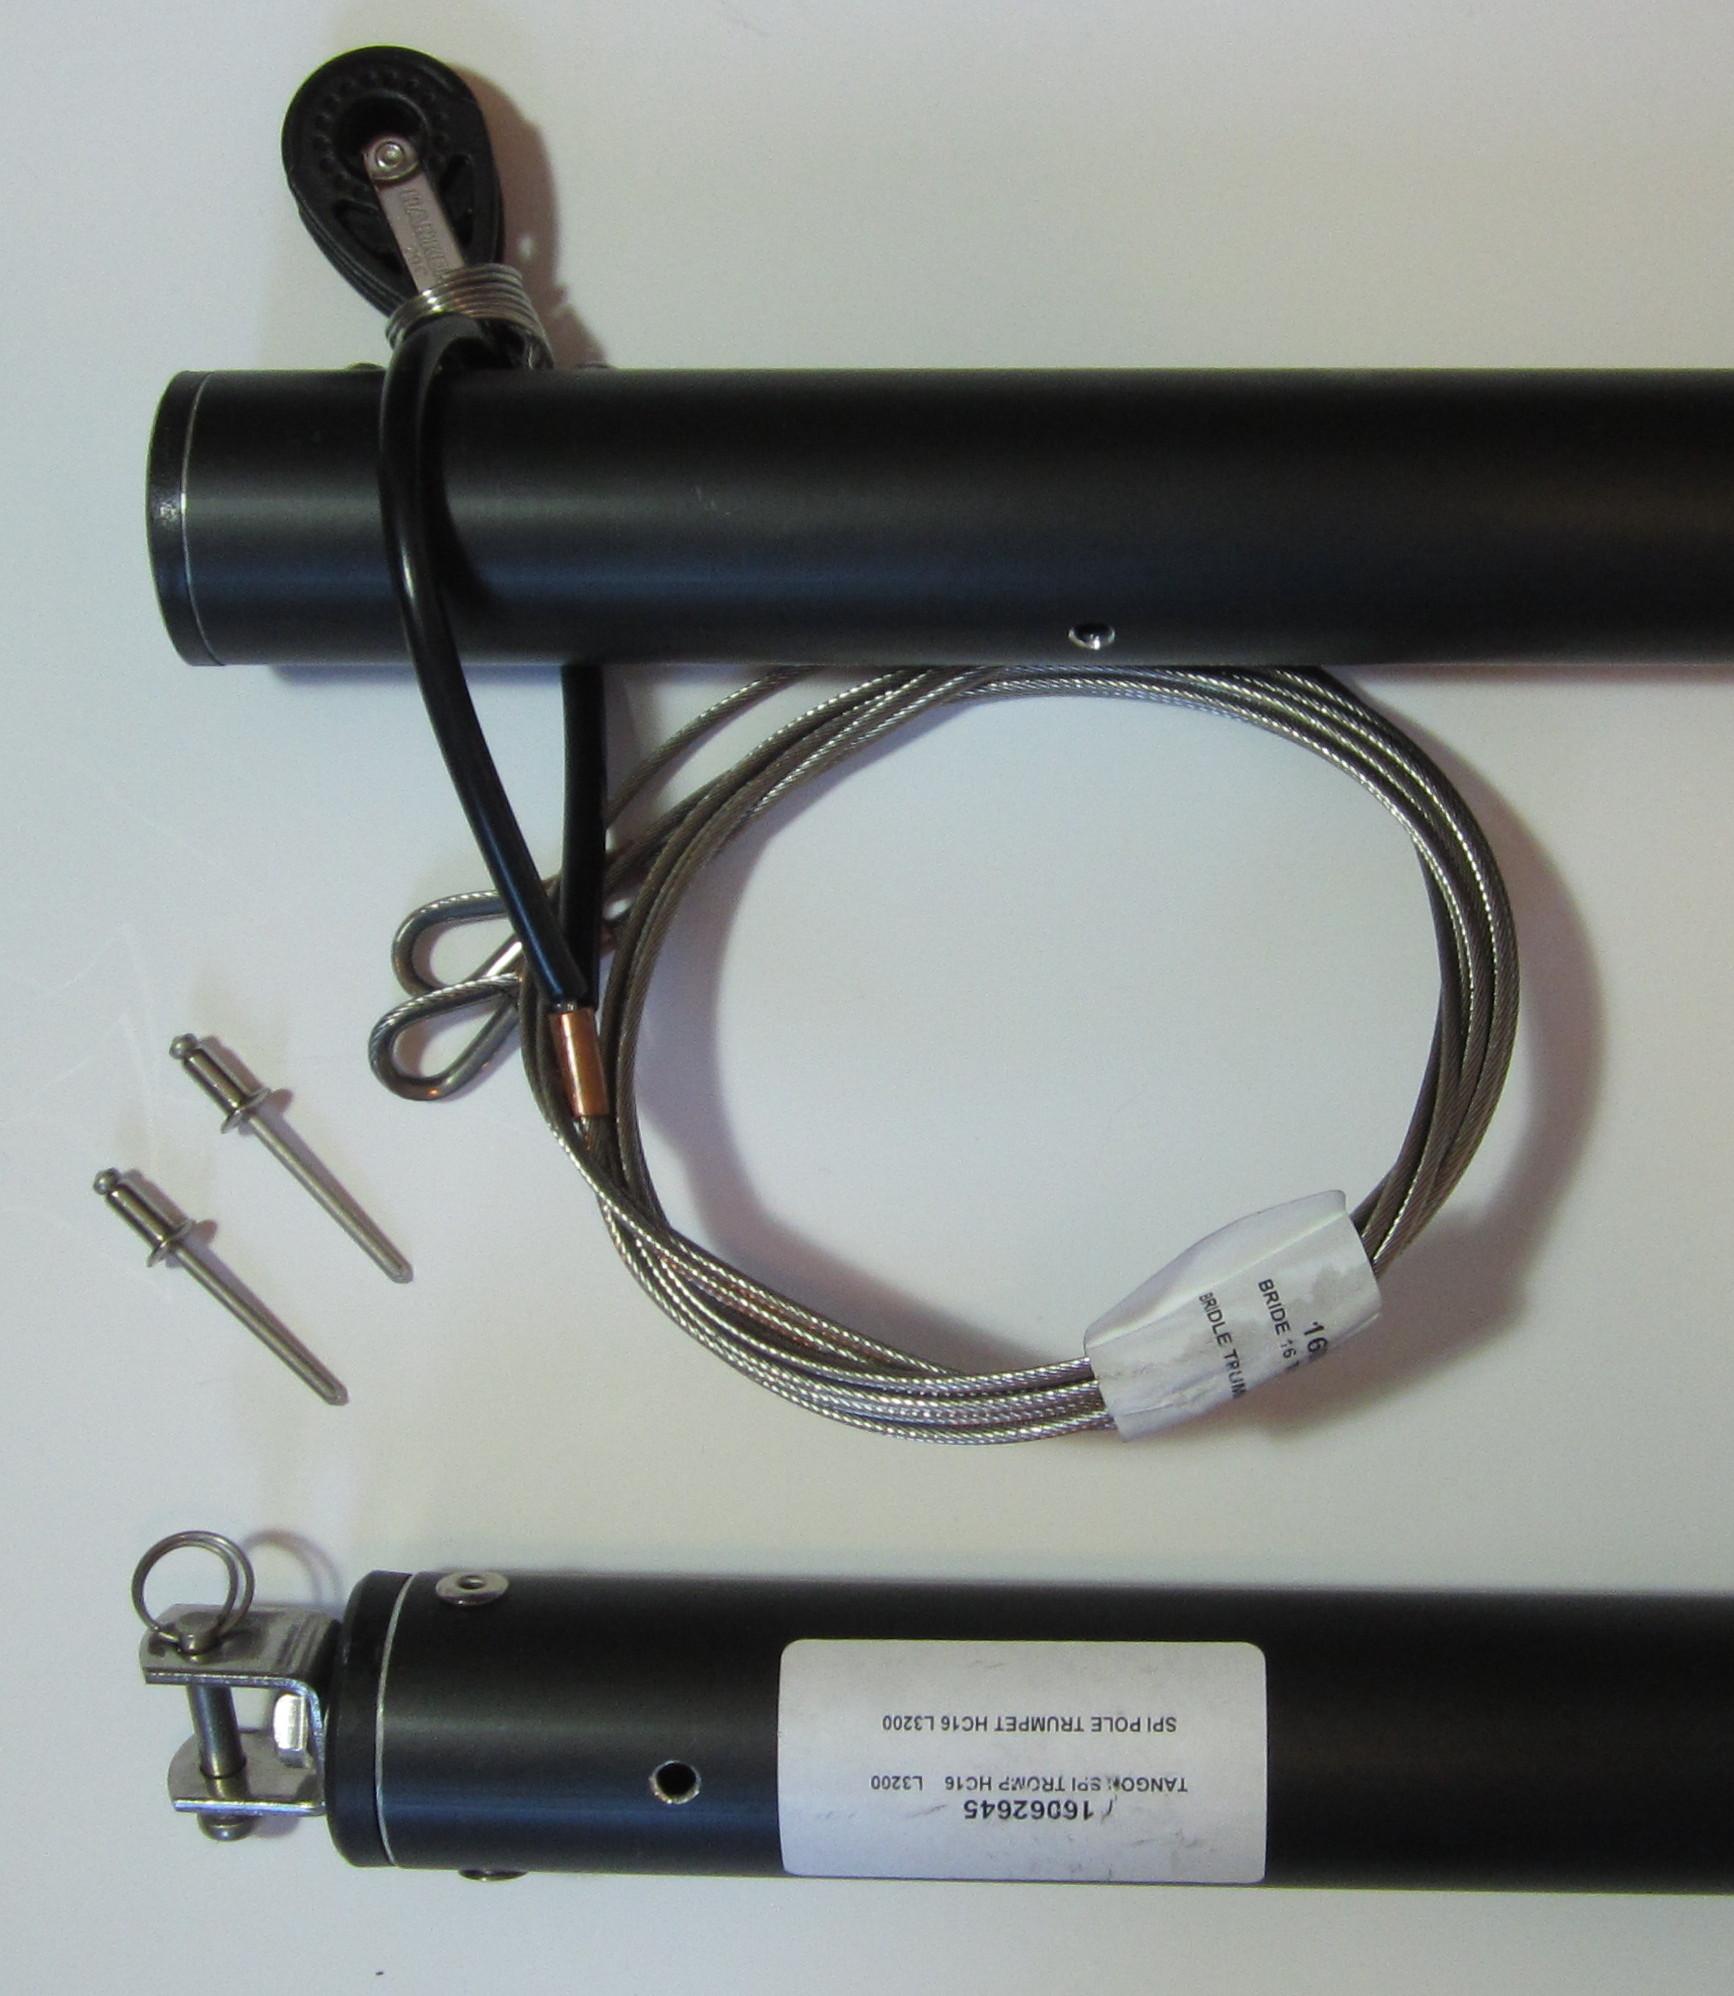
8. Spinnaker pole (2 parts) with attached bridle wires - Qty 1. Two parts join to make one pole. Bridle wires connect front of spinnaker pole to ends of front spreader bar. Won't reach for the Getaway, short ropes (not supplied) are needed.
9. Rivets (1.1cm) (7/16") - Qty 2. Used to join the two halves of the spinnaker pole together (only 1 rivet used).
10. 4mm/1m black spinnaker pole support line (not shown in picture) - Qty 1. Used to tie the pole up to the furler drum.
Small Bag #1
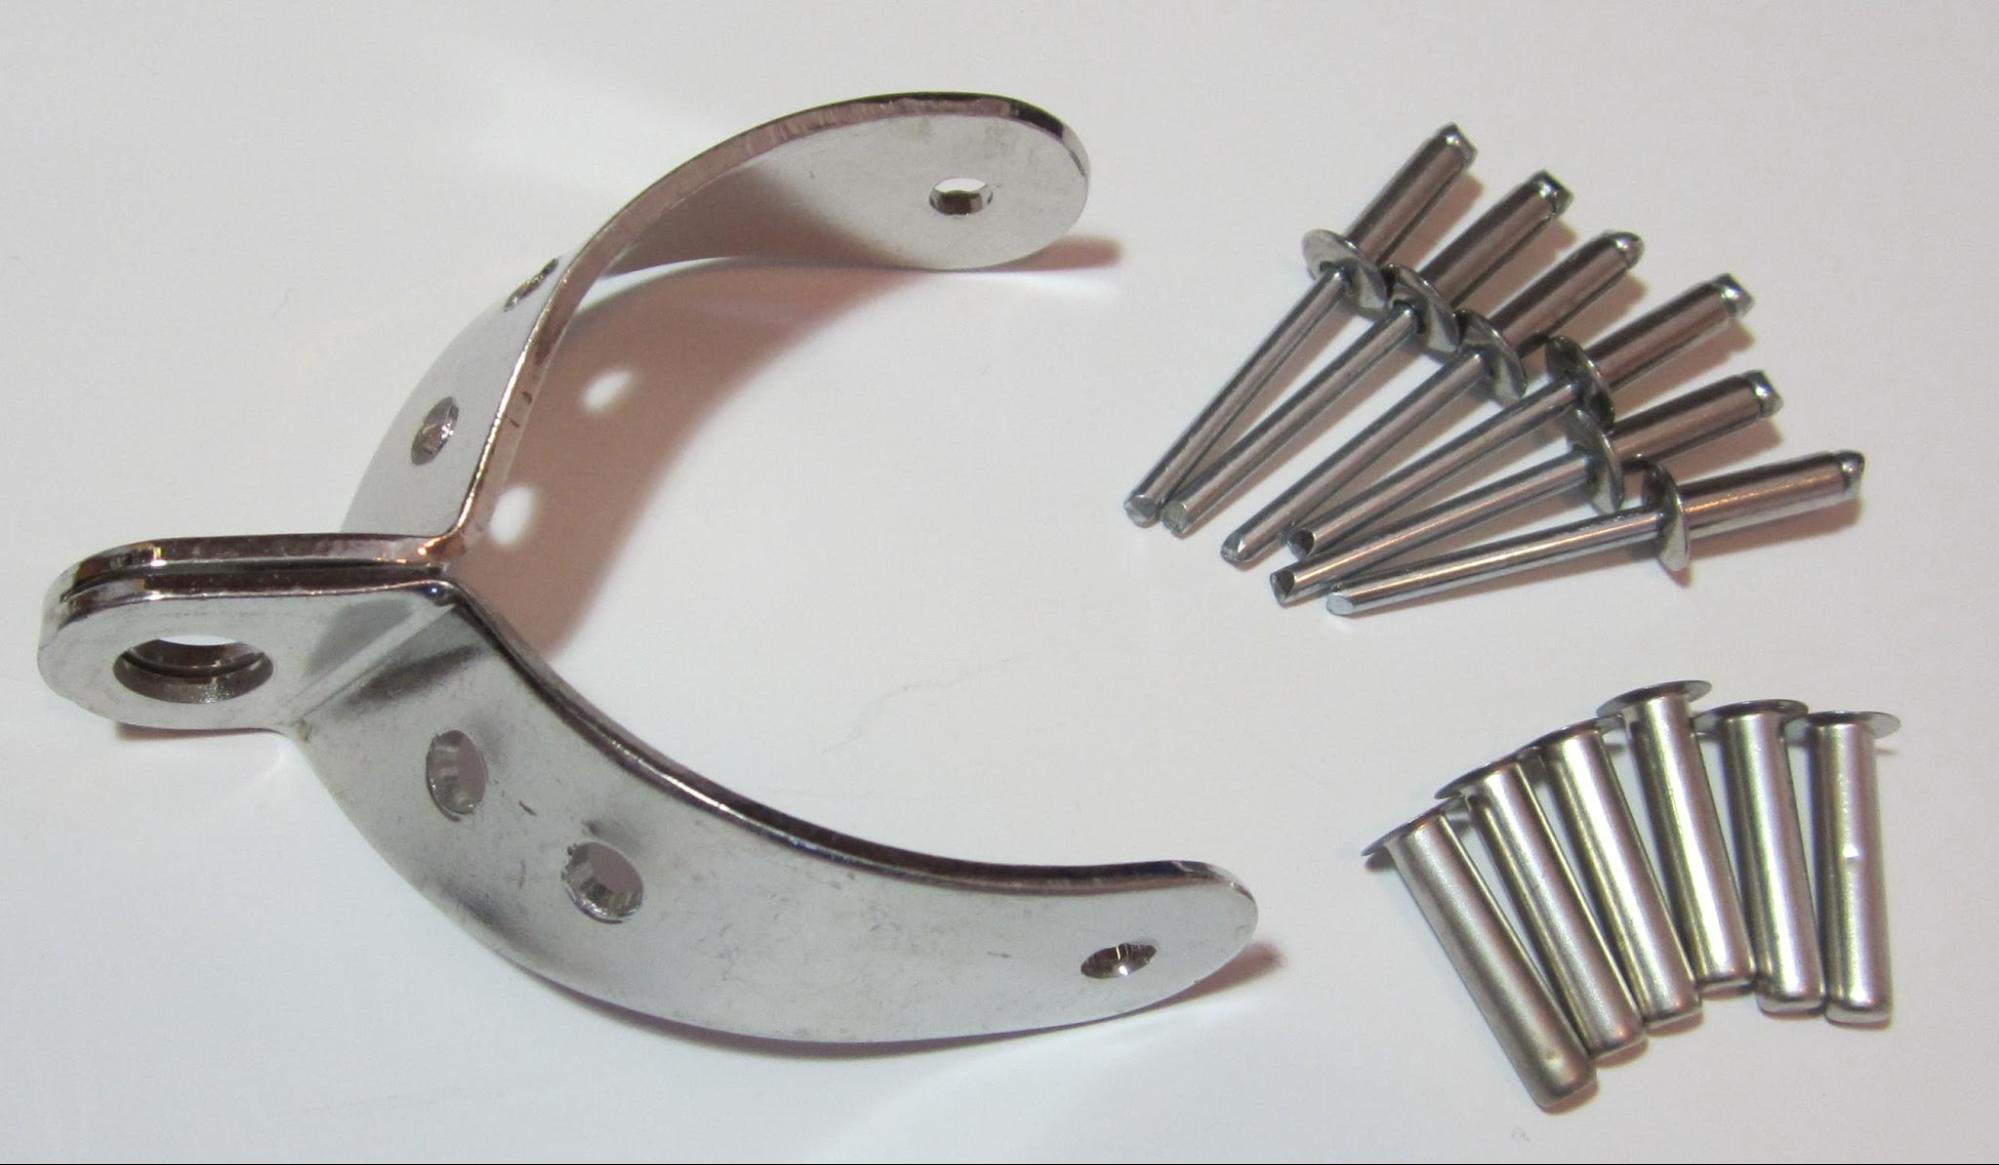
11. Hobie 14 mast tang - Qty 1. Attaches to mast above jib mast tang. Used to hold up the spinnaker.
12. Rivets (1.4cm) (9/16") - Qty 6. Rivets and liners are used to attach mast tang to mast.
13. Rivet liners - Qty 6
Small Bag #2
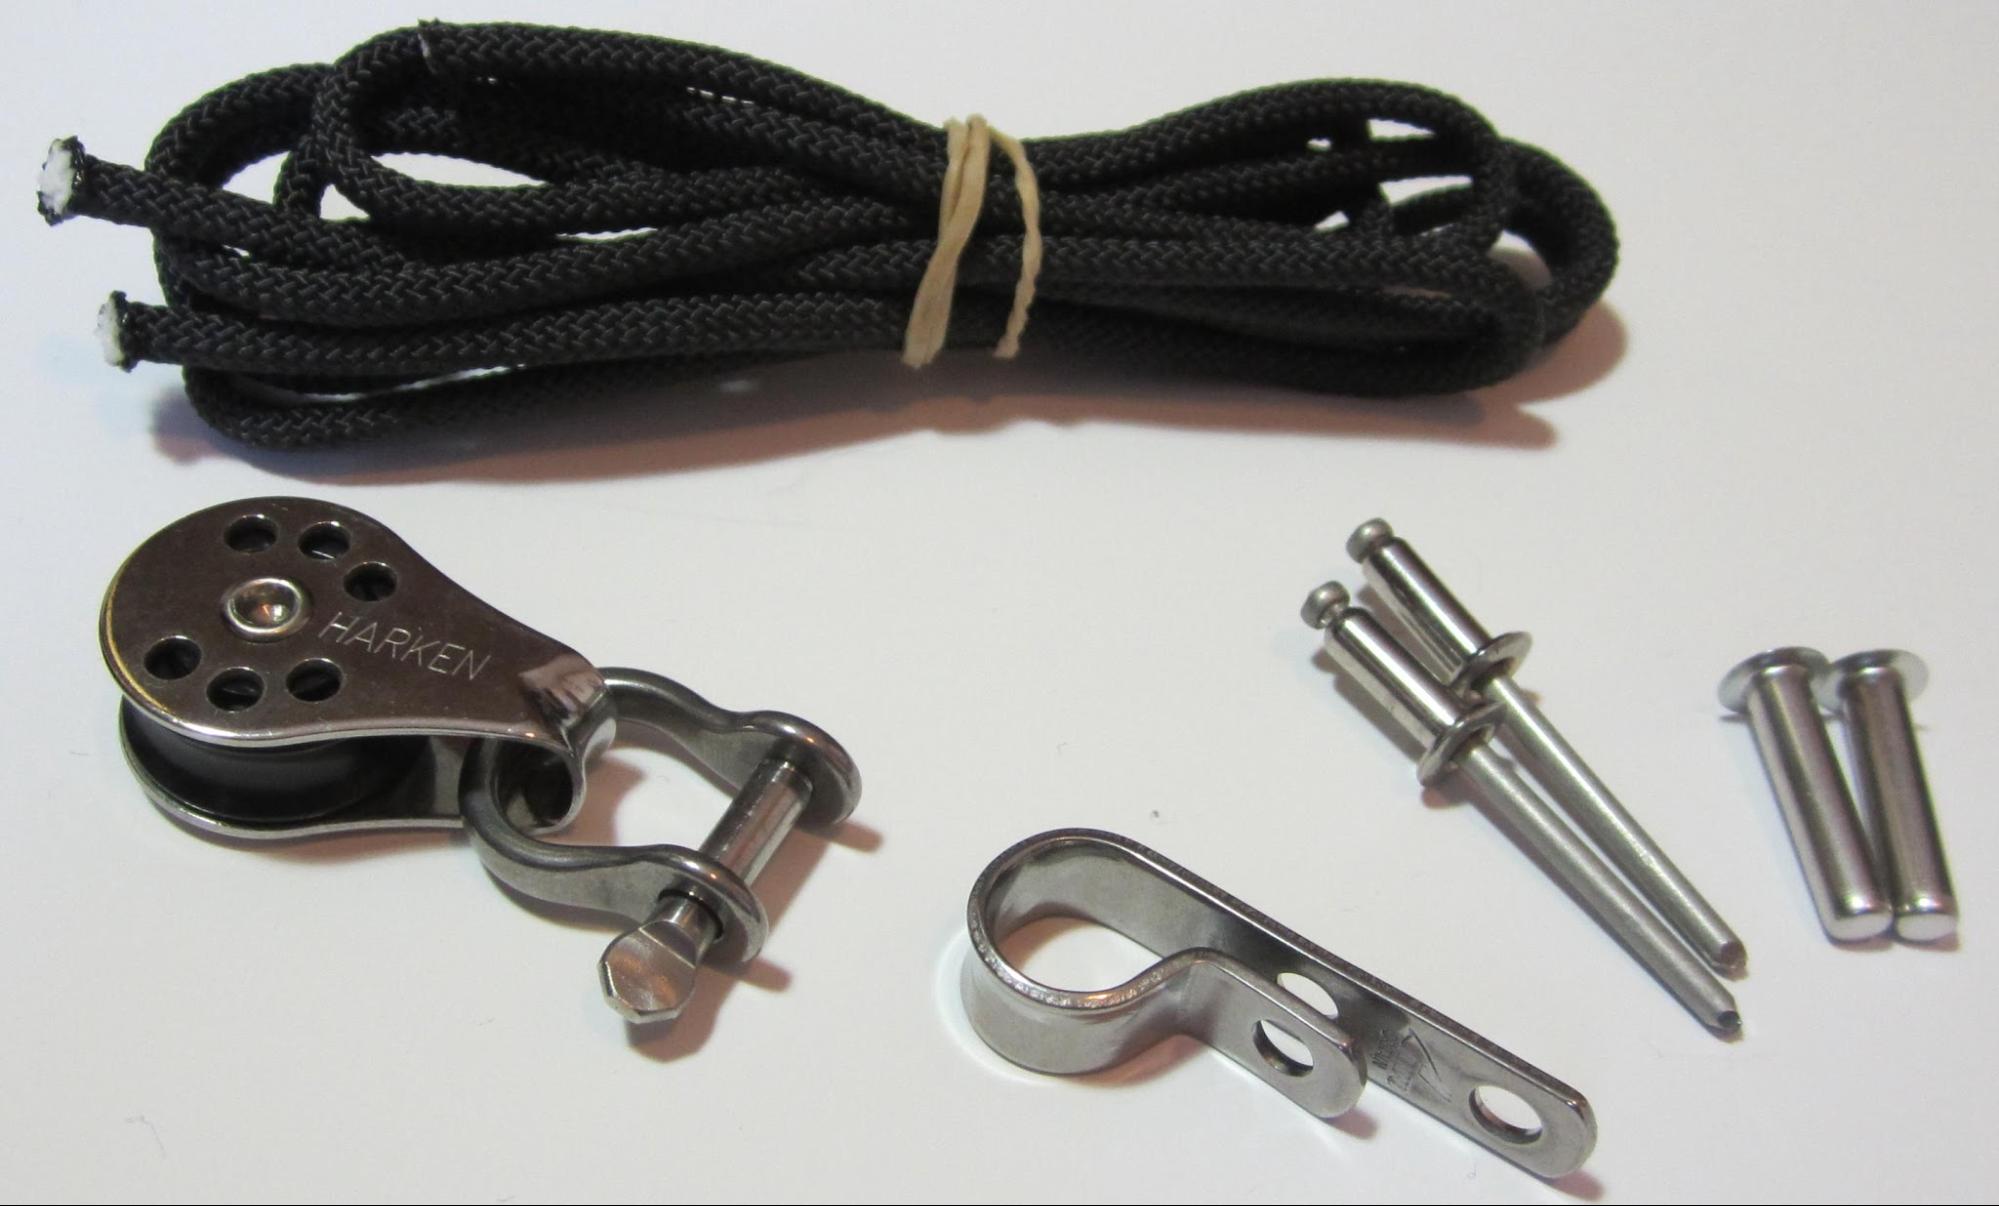
14. Small block - Qty 1. Attaches to spinnaker mast tang, to hold the spinnaker halyard.
15. Shackle - Qty 1
16. Bracket - Qty 1. Not used.
17. Rivets (1.4cm) (9/16") - Qty 2. Not used.
18. Rivet liners - Qty 2. Not used.
19. 70cm black cord - Qty 1. Used to tie narrow end of snuffer bag to spin pole connector bracket (#30).
20. 1m black cord - Qty 1. Not used.
Note 1: All rivets are 5mm (3/8") in diameter.
Note 2: All rivets are much harder to install than regular aluminium rivets. Prepare to squeeze very very hard on your rivet gun.
Small Bag #3
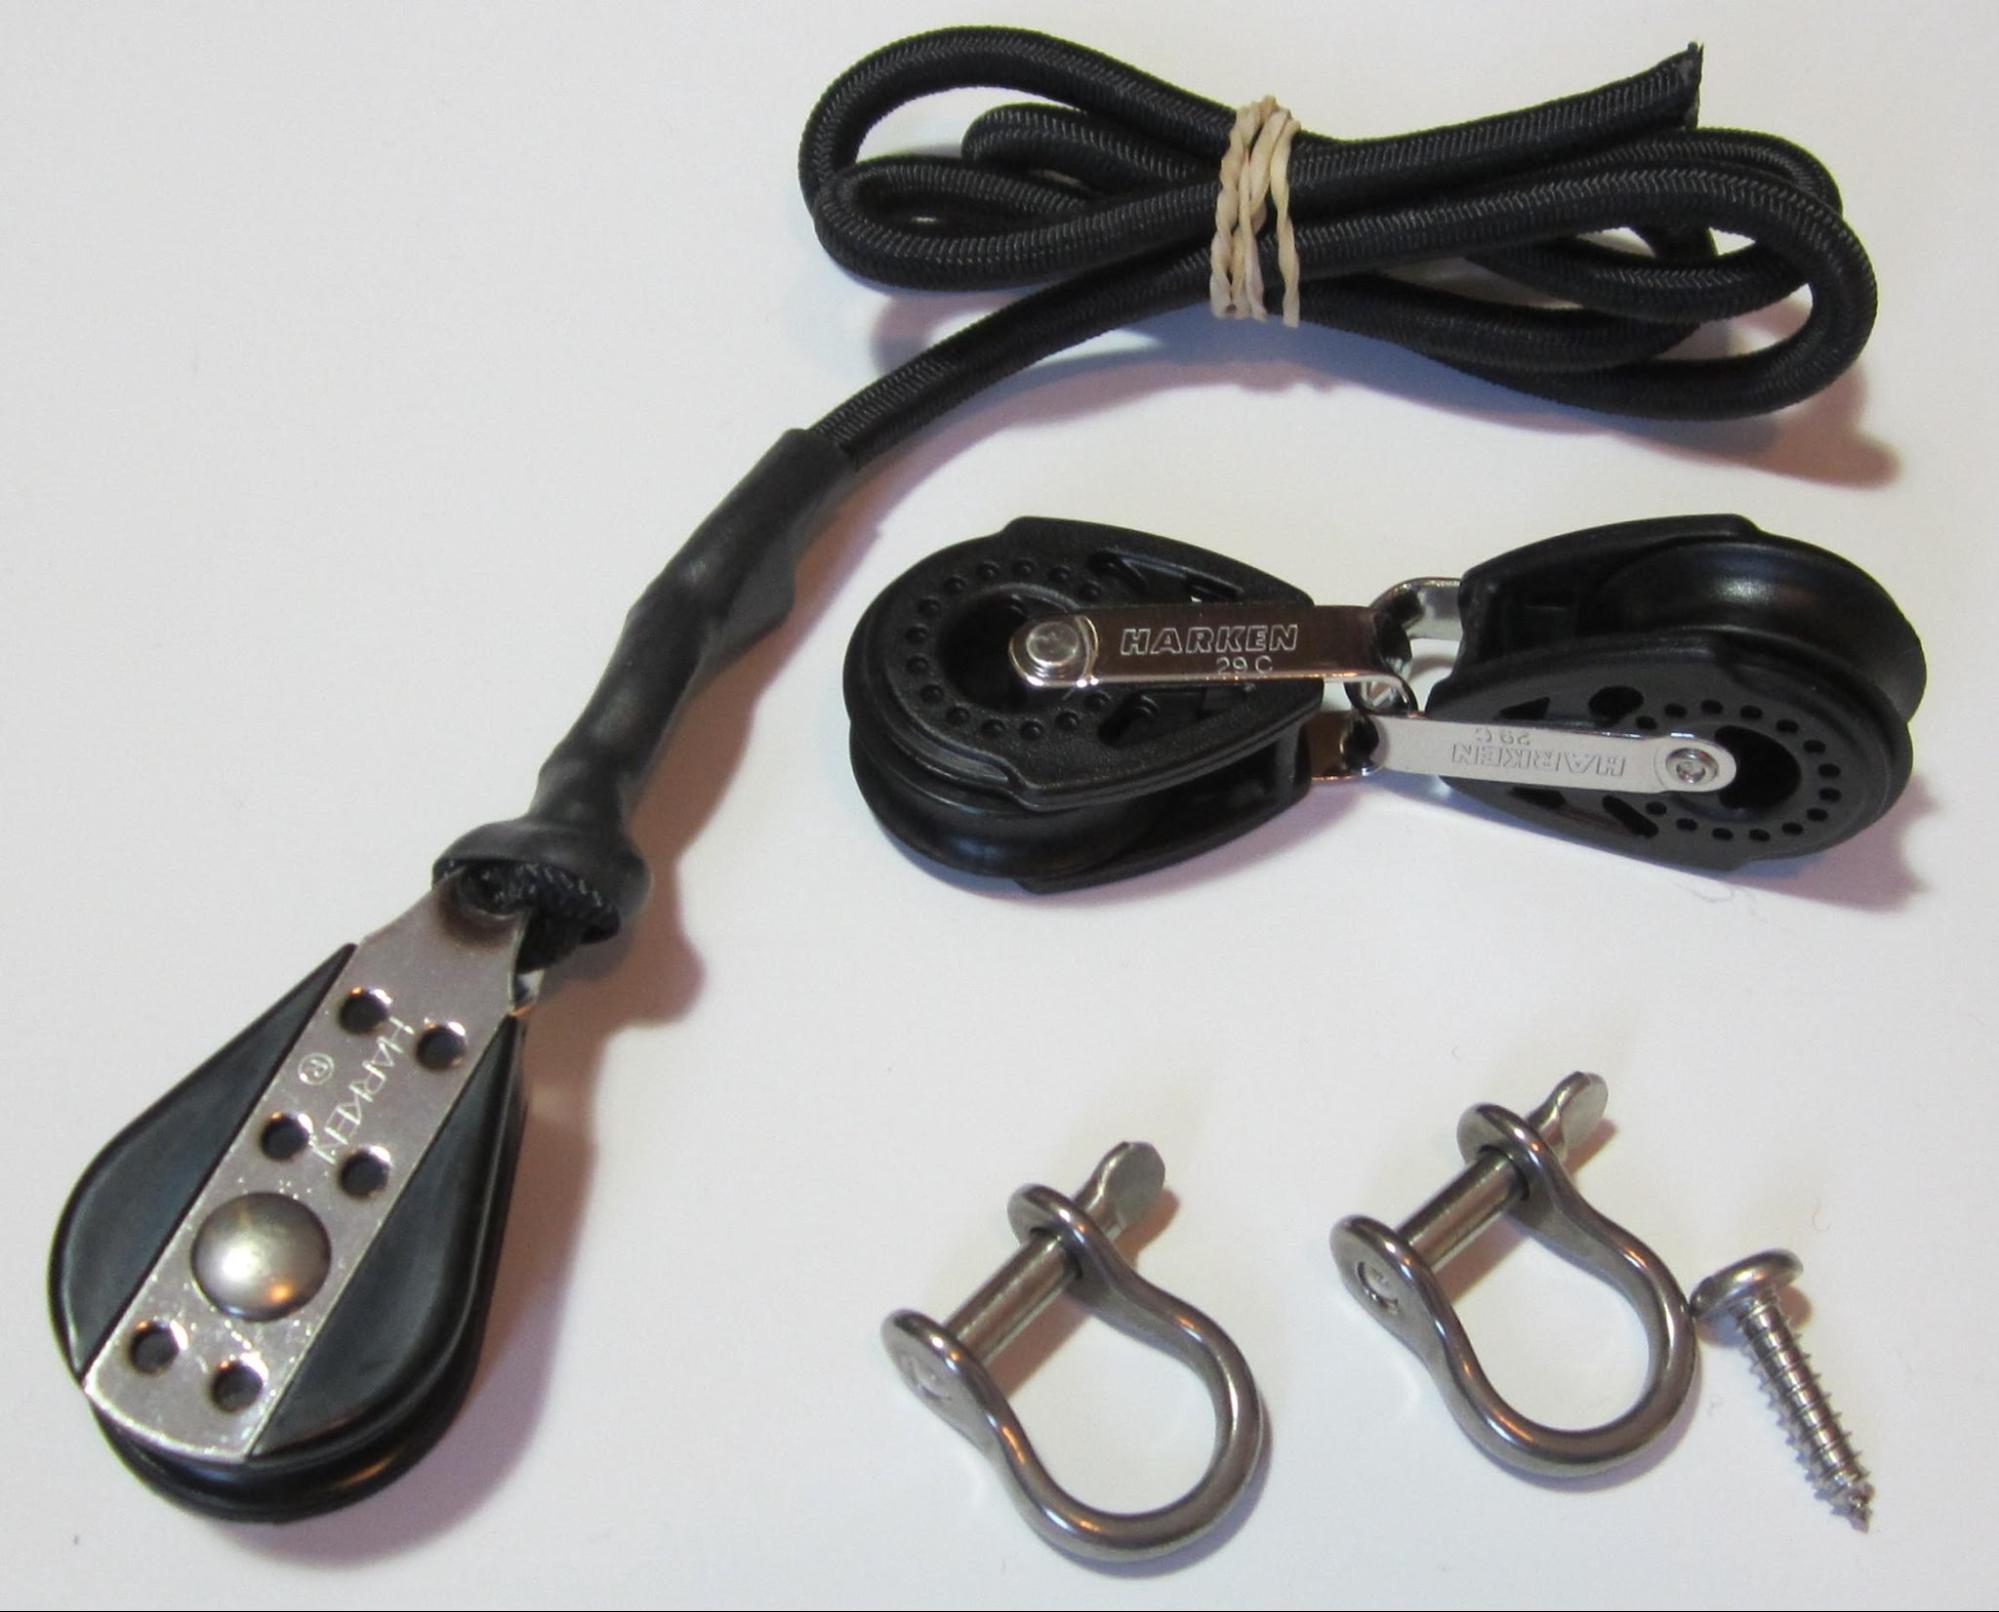
21. Shackles - Qty 2. Used to attach blocks to the side stays.
22. Screw - Qty 1. Not used.
23. Block to block set (29C) - Qty 1. Used to connect the halyard to the tack line.
24. Block with 70cm bungee cord - Qty 1. Used to connect the spin halyard line to the stern spreader bar.
Small Bag #4
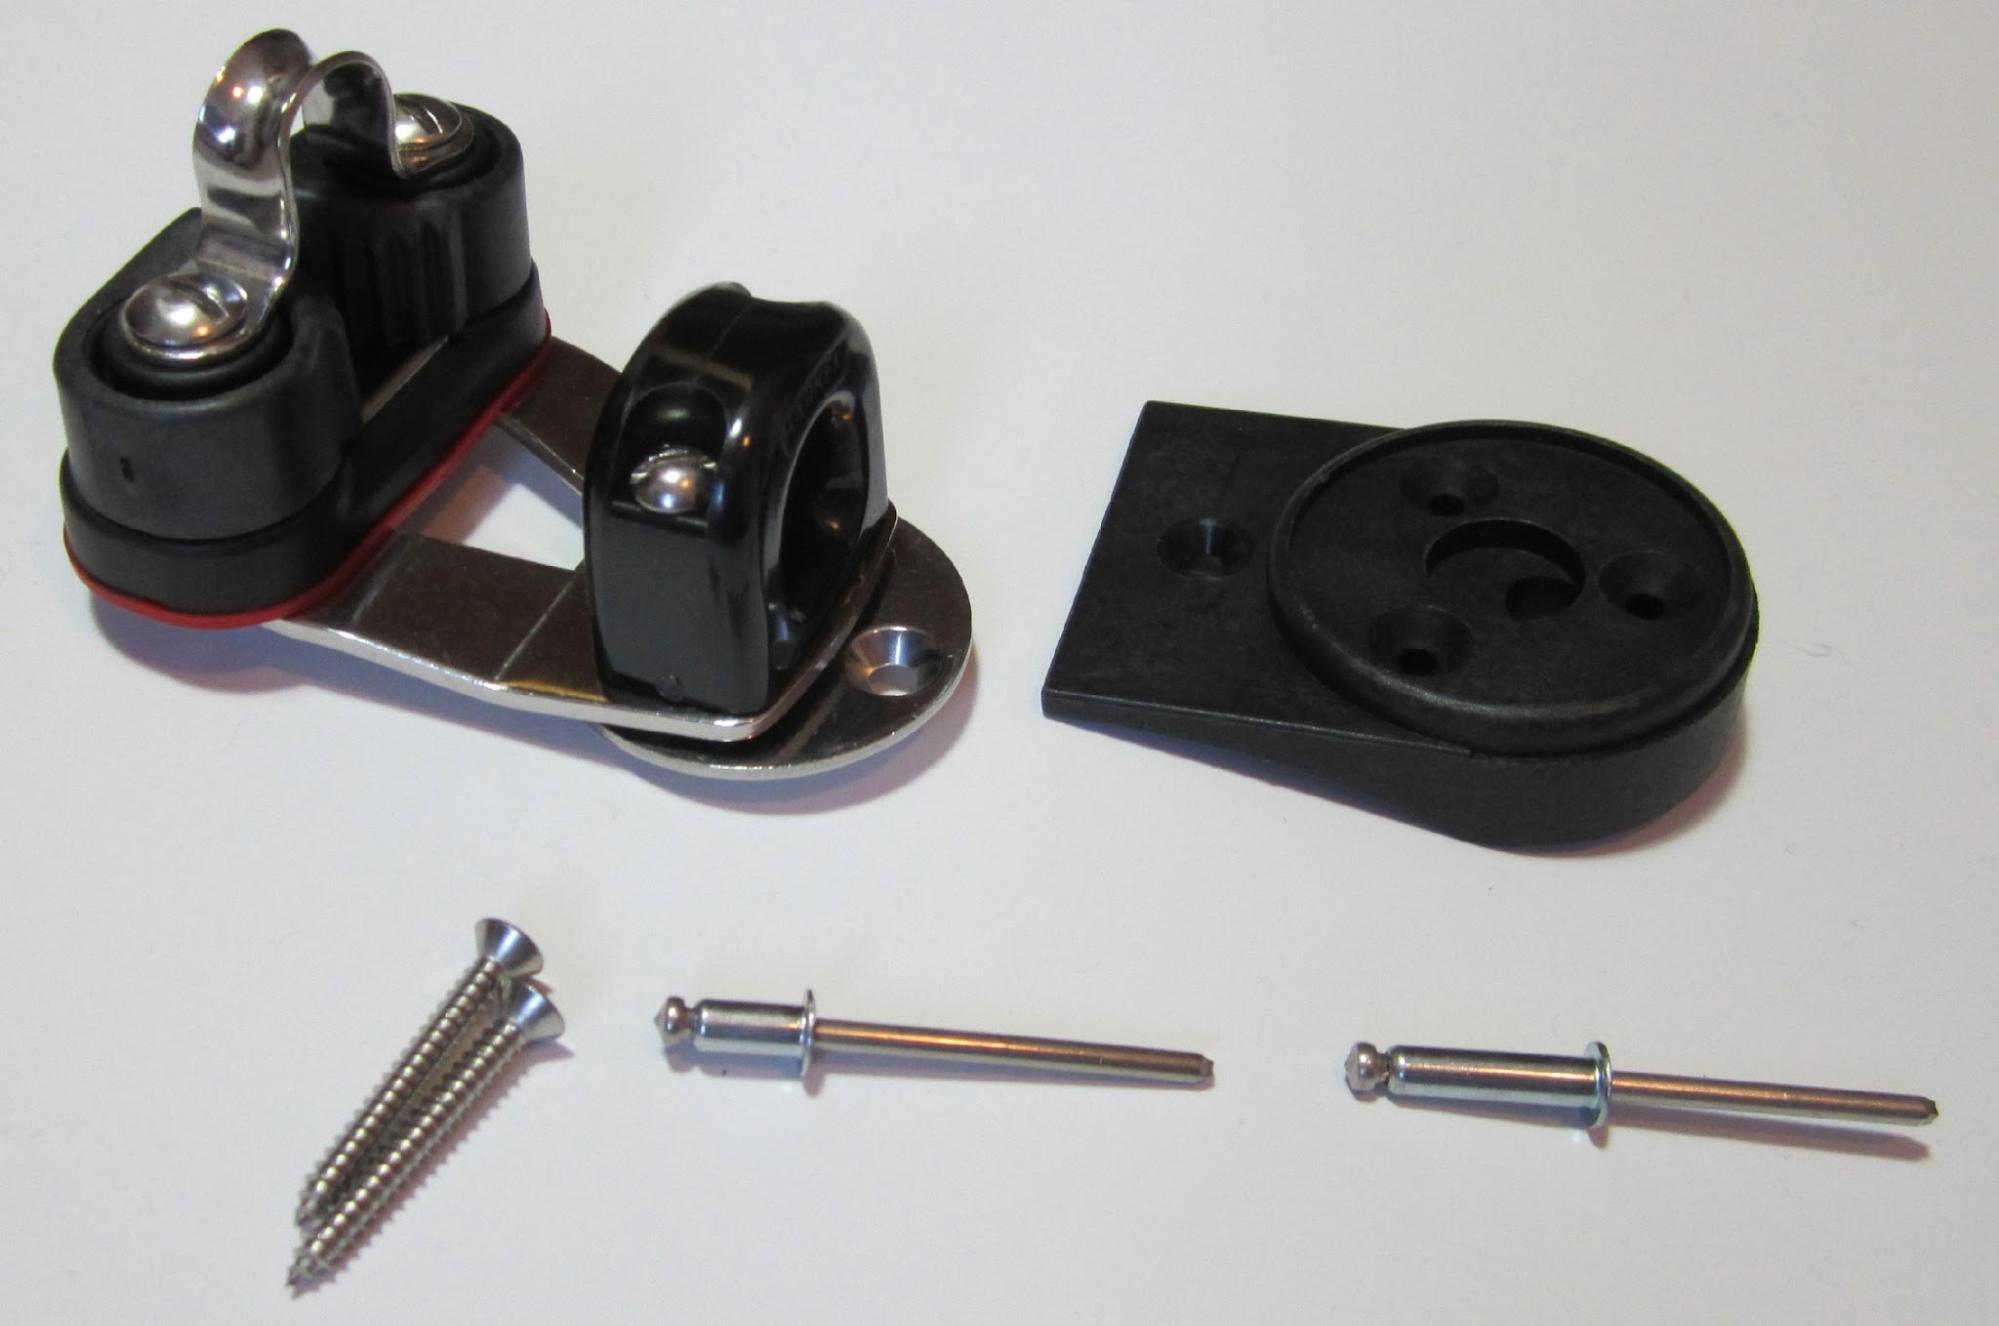
25. Cam cleat - Qty 1. Used to hold the spinnaker halyard.
26. Cam cleat base - Qty 1
27. Long rivet (1.9cm) (3/4") - Qty 1. Used to attach the cam cleat.
28. Short rivet (1.0cm) (3/8") - Qty 1. Used to attach the cam cleat.
29. Screws - Qty 2. Not used.
Small Bag #5
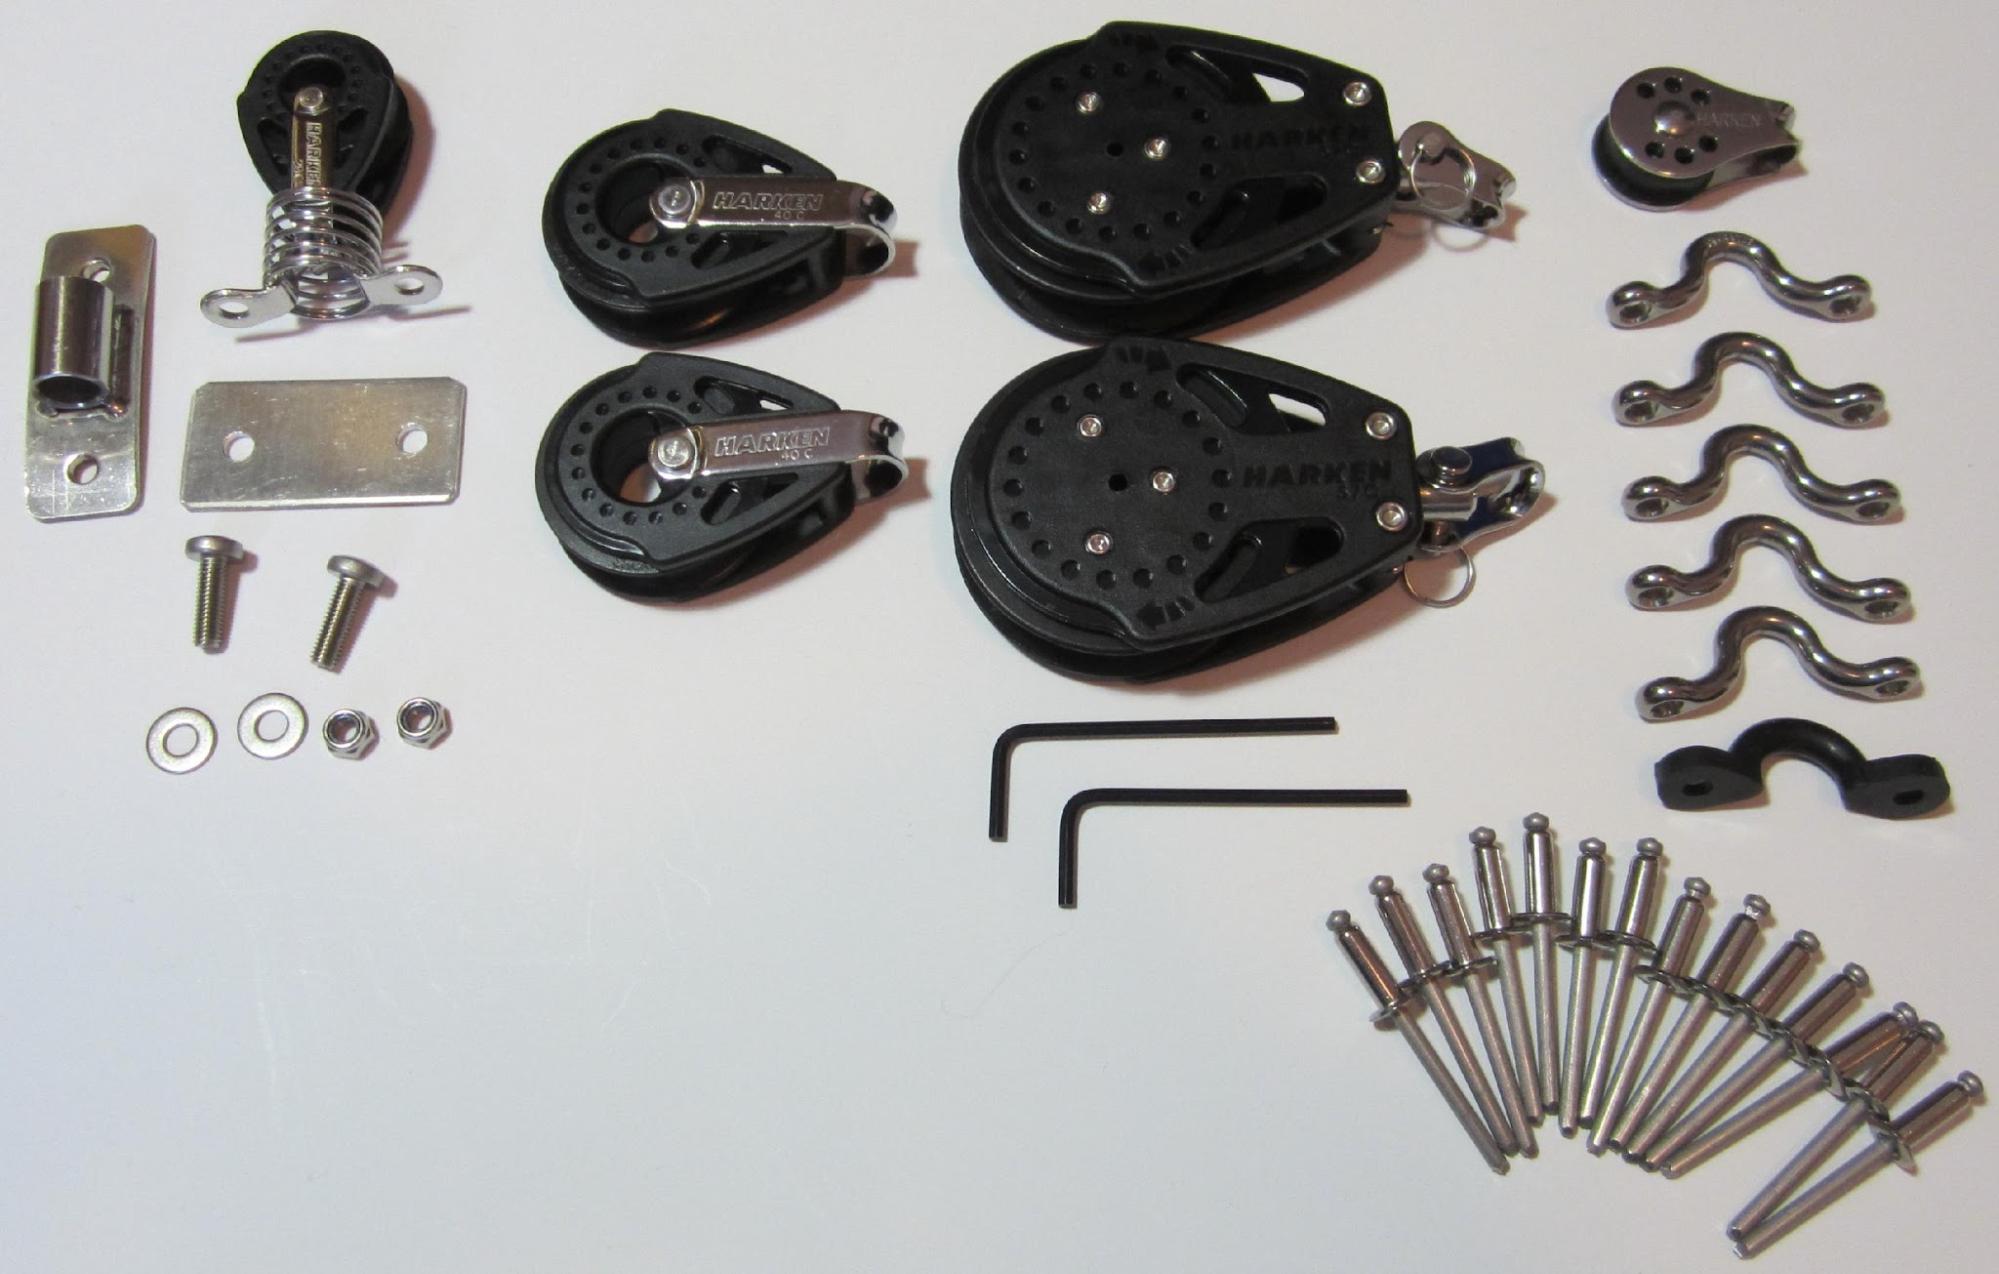
30. Spin pole connector bracket - Qty 1. Connects the spinnaker pole to middle spreader bar.
31. Spring block (29C) - Qty 1. Installs beside cam cleat on middle spreader bar. Holds spin halyard.
32. Spring block base plate - Qty 1. Not used. Intended for H16 tramp installation.
33. Bolts, washer, nuts - Qty 2
34. Blocks (40C) - Qty 2. Installed with metal hoop brackets and rivets on middle spreader bar to hold spin sheet line.
35. Carbo ratchamatic blocks (57C) - Qty 2. Connects to the side stay to hold the spin sheet line.
36. Allen key - Qty 2. Adjusts the block ratchet.
37. Small block - Qty 1. Not used.
38. Metal hoop bracket - Qty 5. Only 3 of 5 used.
39. Plastic hoop bracket - Qty 1. Not used.
40. Rivets (1.4cm) (9/16") - Qty 14. Only 13 of 14 used.
 SECTION C: HARDWARE INSTALLATION (Requires a Drill)
These steps require a drill and a good rivet gun.
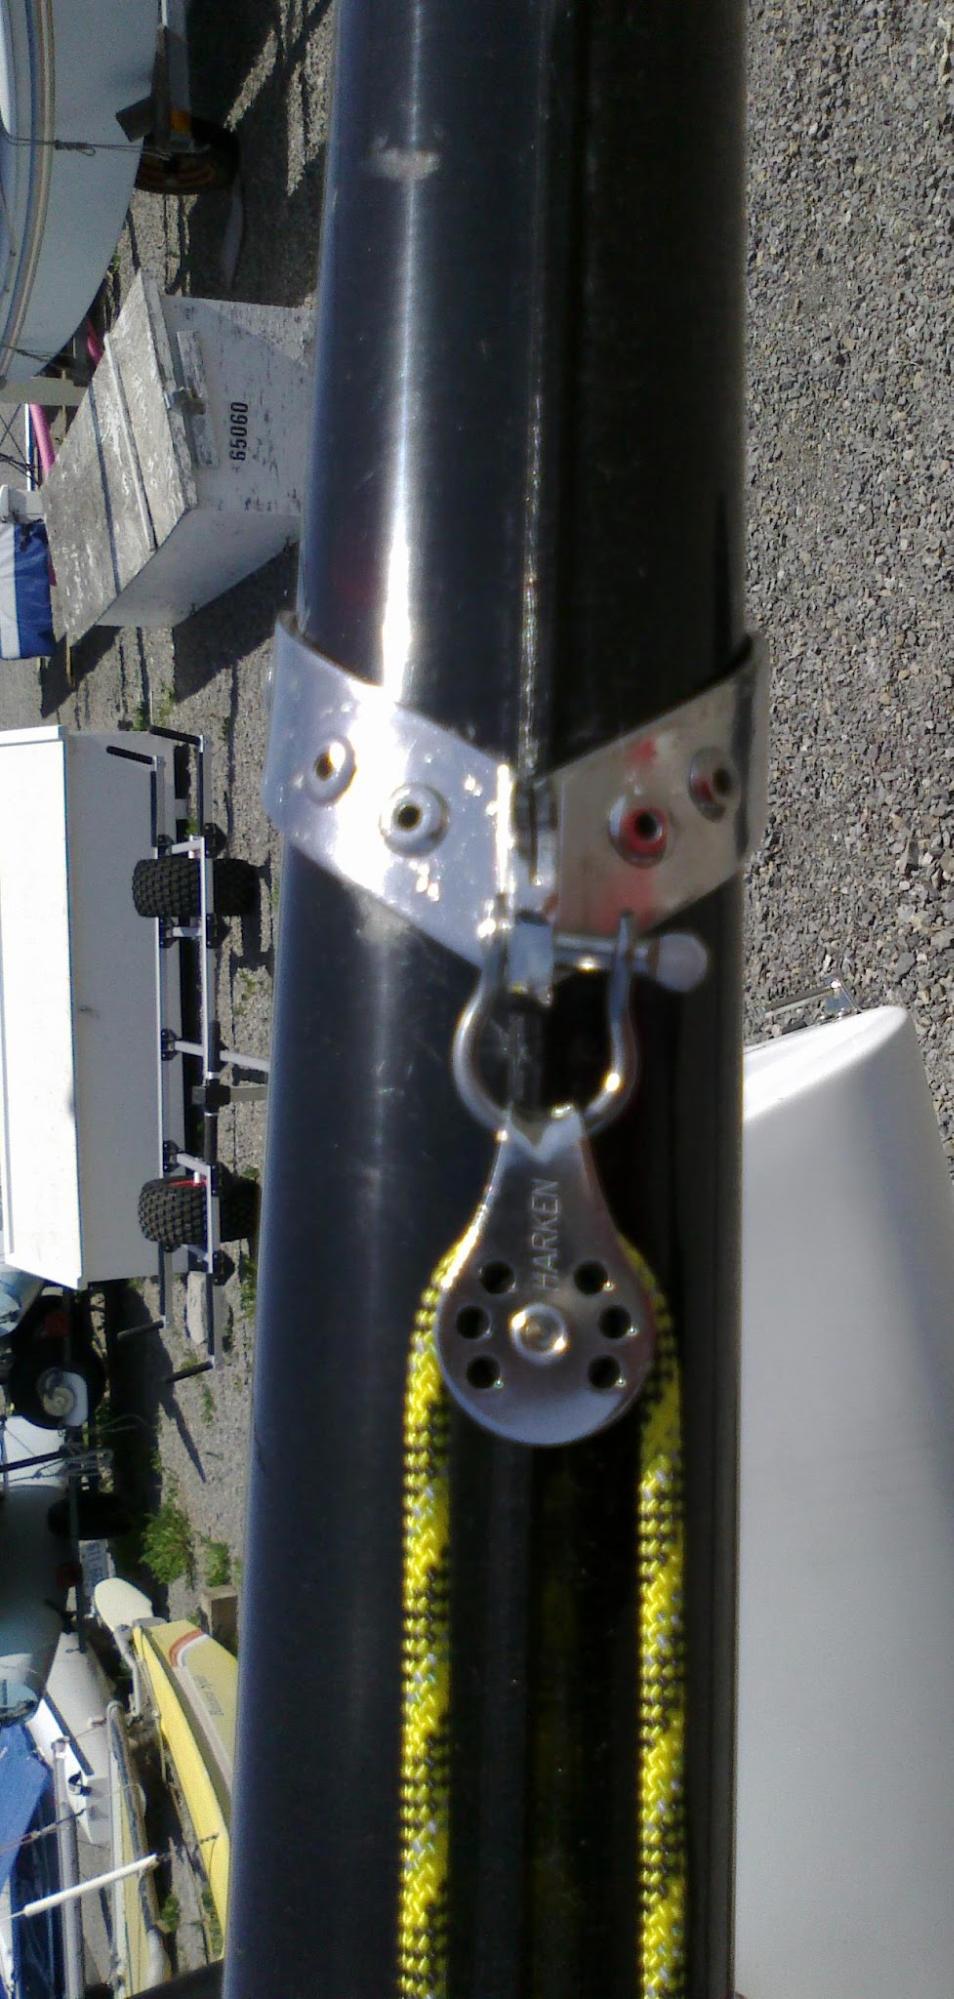
Step 1: Install Spinnaker Mast Tang
This step mounts the bracket that holds the spinnaker up the mast. See parts 11-13 in the parts list.
a) Mark the location for the bracket. The bracket needs to be installed 153cm (60") above the jib mast tang. Measure from the centre of the top shackle hole on each tang.
b) Dry fit the mast tang. Bend the mast tang until it fits snugly without gaps. (Note: This step took me an hour!)
c) Clamp the mast tang in place as a drill guide, then drill the six holes using a 3/16" bit. Remove the mast tang. Enlarge the holes using a 7/32" bit.
d) Install the six rivet liners into the holes. Then fit the mast tang so that it lines up over the rivet liners. Insert all six rivets before compressing the first rivet because the bracket will likely move, and the holes will cease to align, if you don't.
e) While holding the mast tang firmly in place, compress the lower front rivets using a rivet gun. After the two front rivets are compressed, compress the next highest rivets until all six are compressed.
f) Attach the mast halyard block (part 14) to the spinnaker mast tang using a shackle (part 15). Thread the spinnaker halyard (part 16) through the halyard mast block, and secure both ends to the boat. Raise the mast.
Step 2: Install Spinnaker Pole Bracket
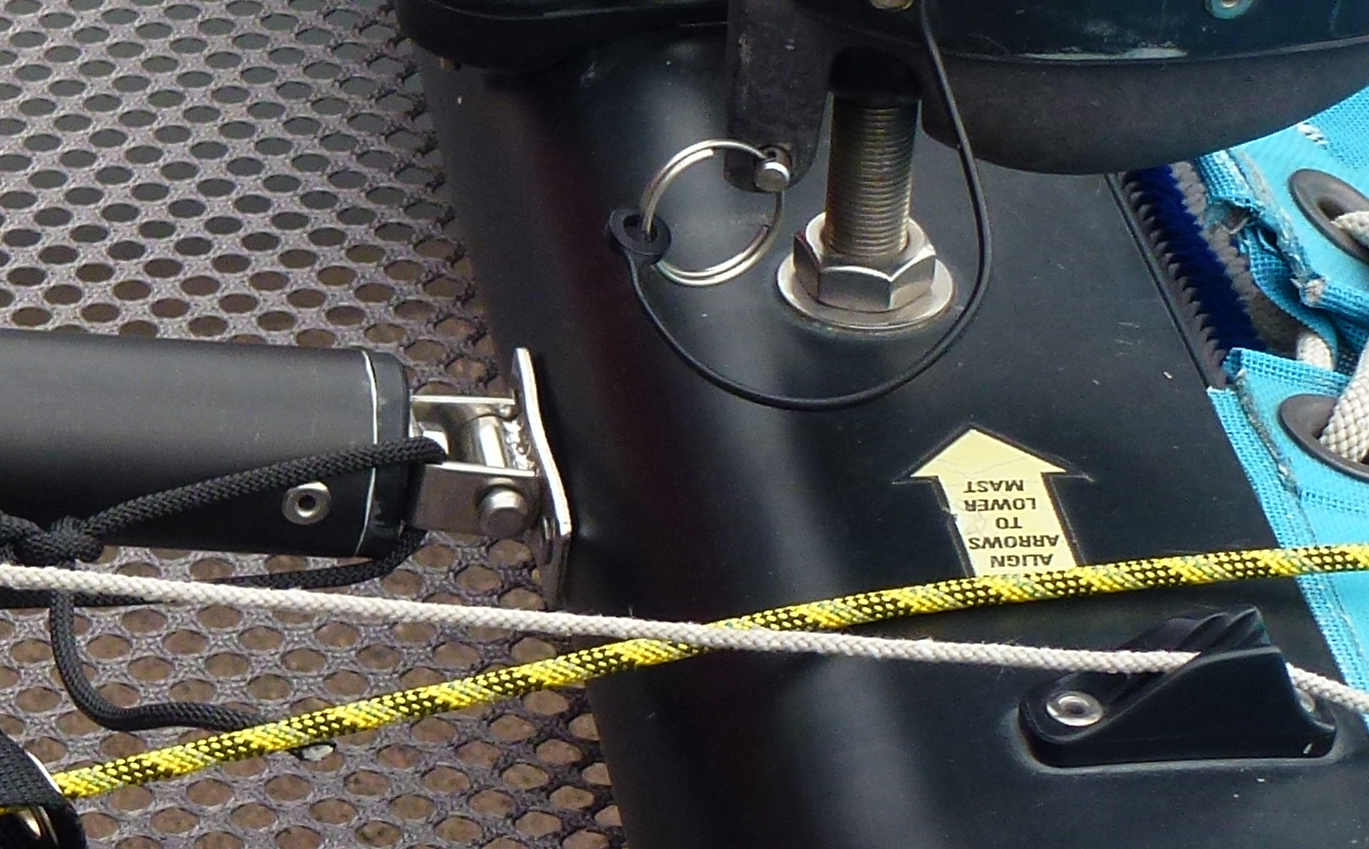
This step mounts the bracket that is used to hold the spinnaker pole to the middle spreader bar. See parts 30 and 40 in the parts list.
a) Hold the spin pole bracket on the bow side of the middle spreader bar, directly in front of the mast ball post. Temporarily clamp something long to the bracket to ensure that it is parallel to the spreader bar. Mark the holes.
b) Drill the two holes using a 3/16" bit.
c) Insert the two rivets (part 40). Compress the rivets.
Step 3: Connect Spin Pole Halves and Install Front Stay Bracket
This step connects the two halves of the spin pole together, and installs the metal hoop that holds the pole to the front stay. See parts 8, 9, 38 and 40 in the parts list.
a) Dry fit the two halves of the spin pole together. Connect the spin pole to the spin pole bracket on the middle spreader bar. The drain hole near the bracket end should be on the bottom.
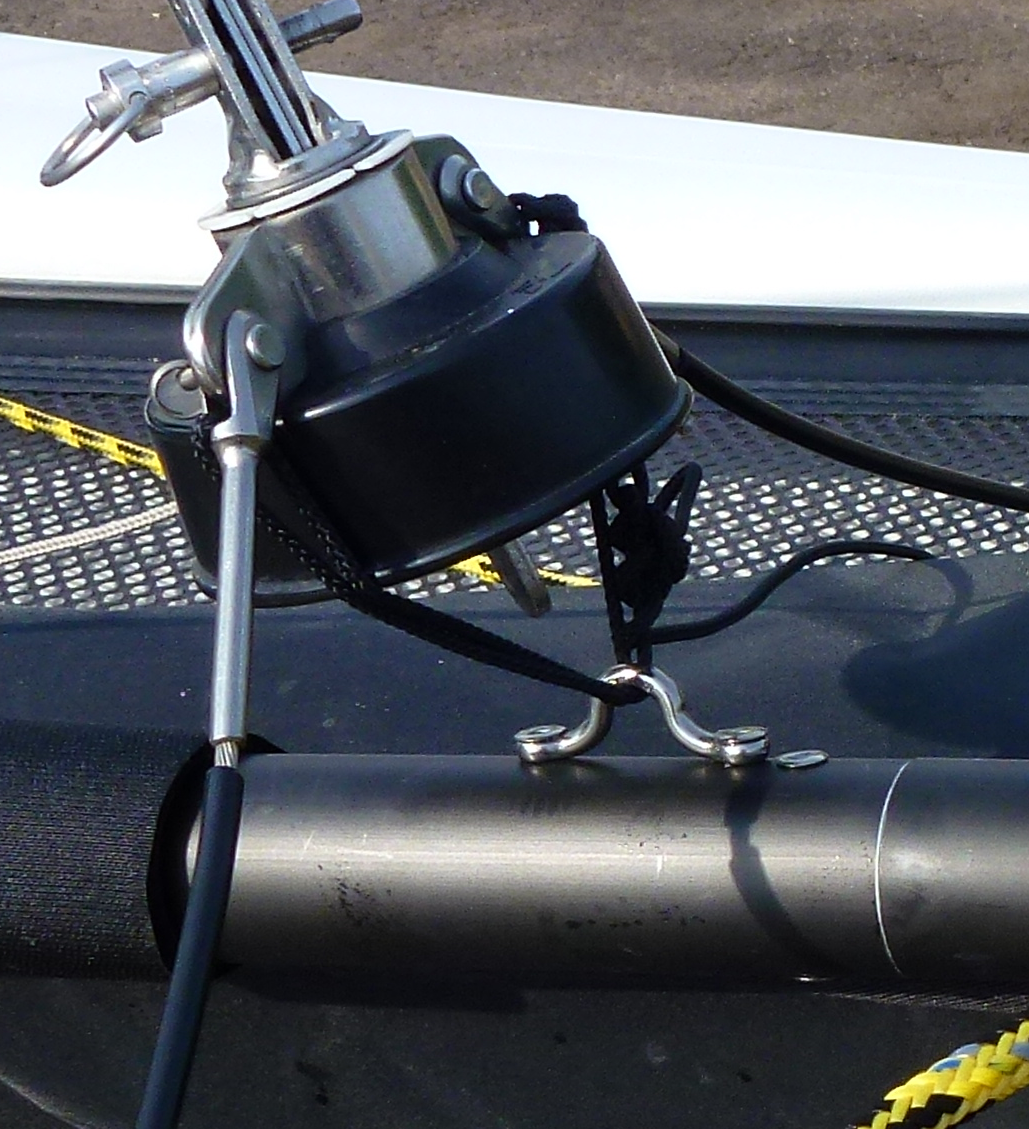 b) Mark a spot on the top side of the pole, 2.5cm from the join point, measuring towards the bracket (spreader bar) end of the spin pole, not the block (front) end.
c) Hold the two ends of the pole together. Drill the hole using a 3/16" bit. Be careful not to let the parts slip apart while drilling.
d) Insert a 1.1 cm rivet (part 9). Compress the rivet.
e) Mark a spot 3.5cm from the join point, measuring towards the bracket (spreader bar) end of the spin pole, not the block (front) end. It should be just behind the rivet just inserted (stern side).
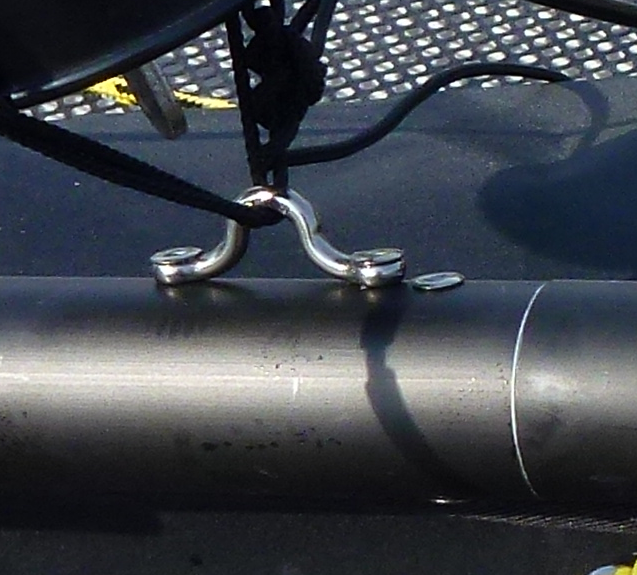
f) Dry fit one hole of a metal hoop bracket on the marked spot. Mark the second hole of the metal hoop bracket. Since the holes are about 4cm apart, this second hole should be about 7.5cm from the spin pole join point.
g) Confirm that the location of the metal hoop bracket will place the hoop approximately in line with the front stay (this is why the mast is raised). Drill the two holes using a 3/16" bit.
h) Hold the metal hoop bracket over the two holes. Insert two 1.4cm rivets (part 40). Compress both rivets.
Step 4: Install Spinnaker Pole Ring
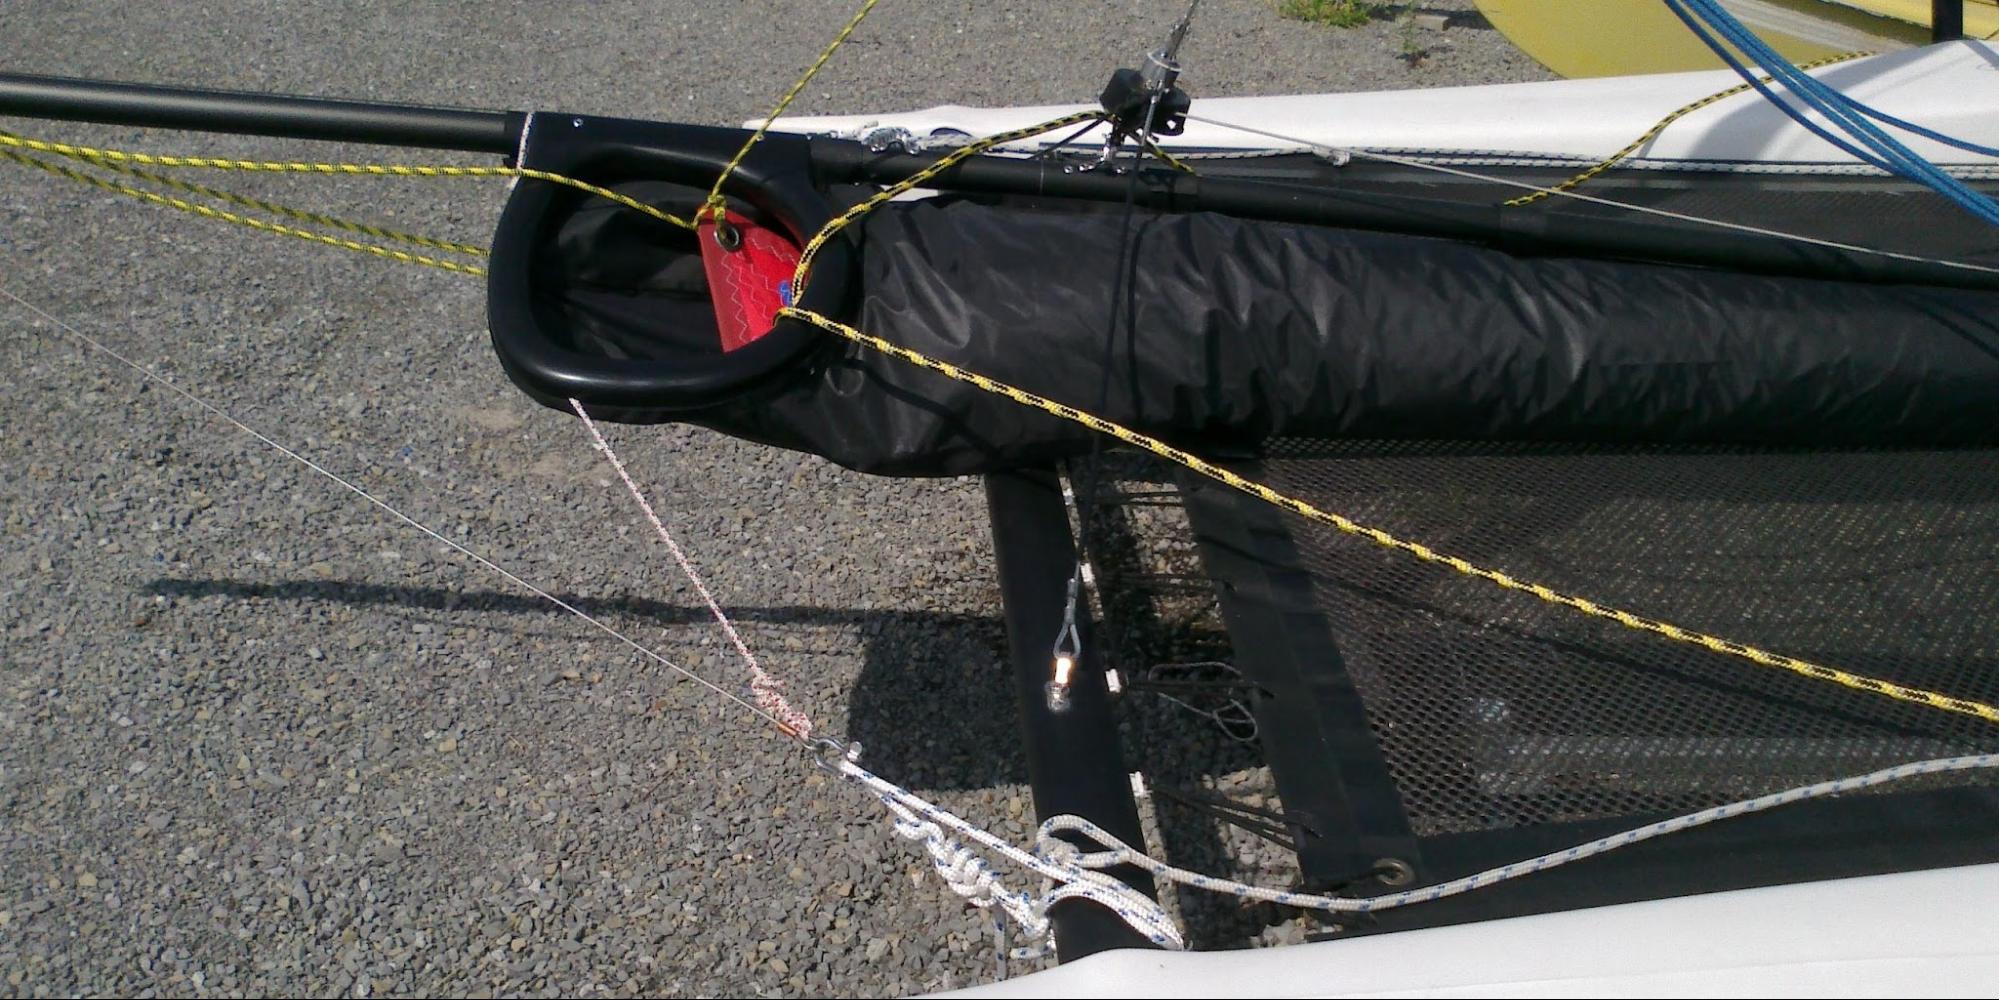
This step mounts the snuffer bag ring to the front half of the spin pole. See parts 1, 2, and 40 in the parts list.
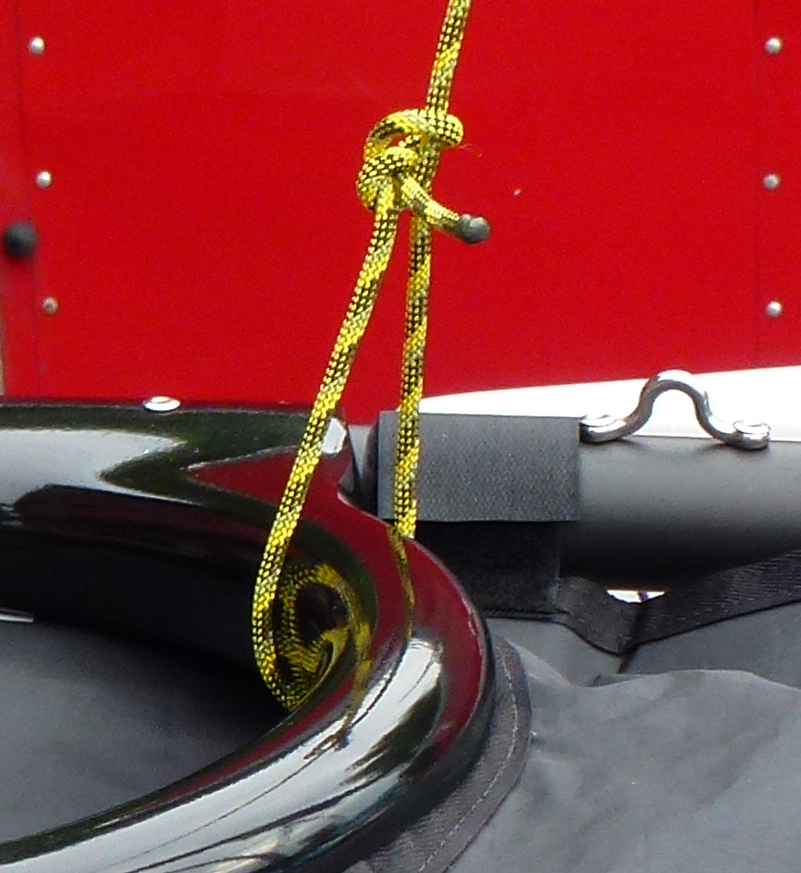
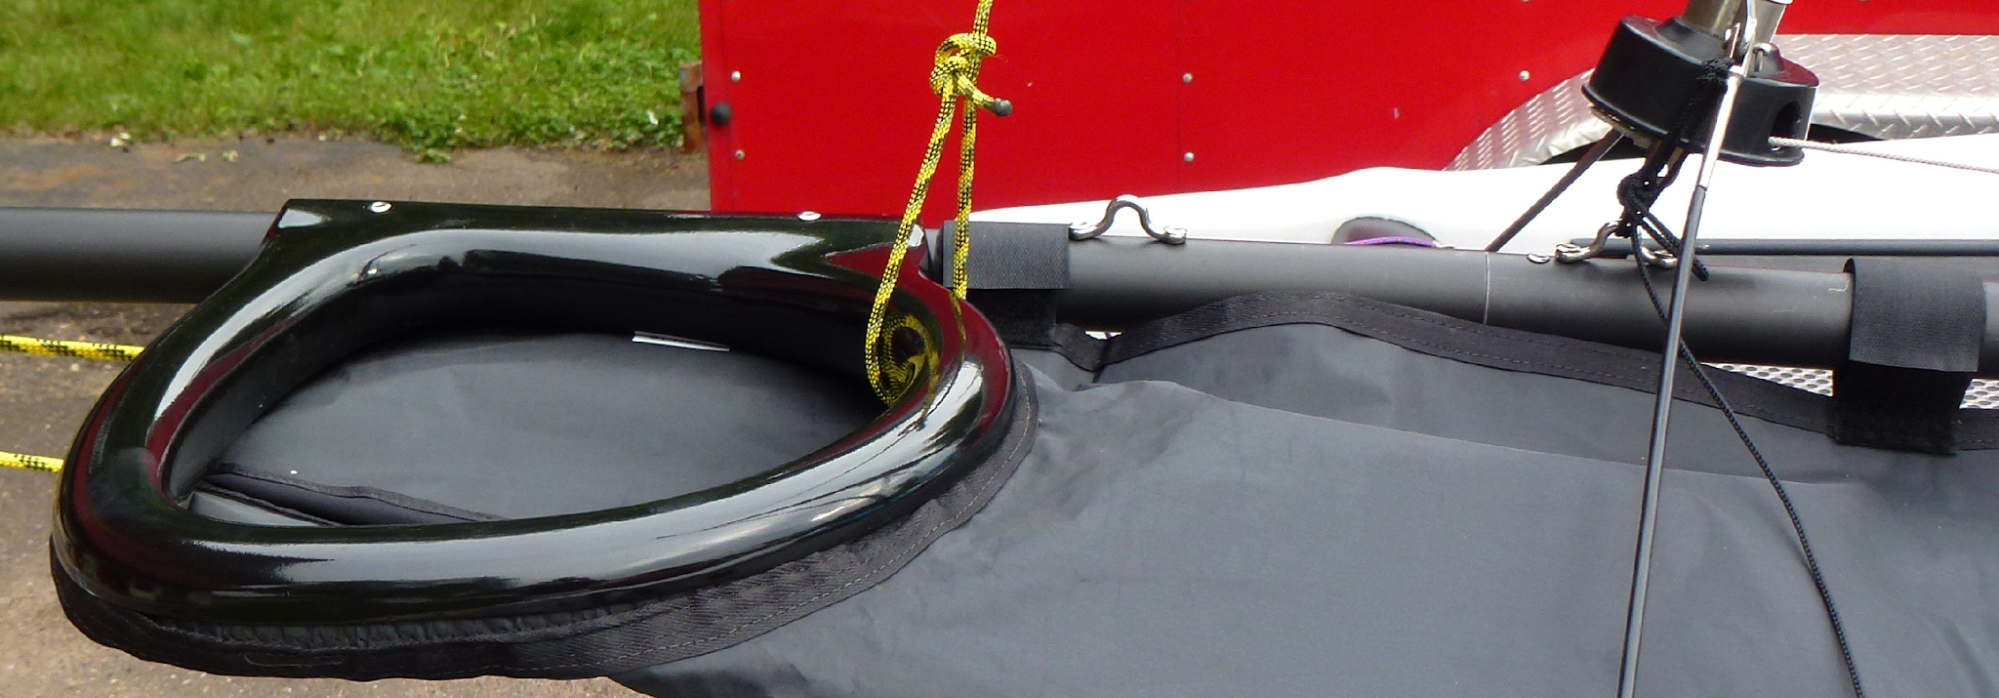
a) Attach the snuffer bag to the snuffer bag ring by feeding the cord along the forward end of the bag into the track located on the underside of the hoop.
b) Mark a spot 11cm directly in front of the front rivet of the unused H16 hoop bracket (132cm from the front (block) end of the spin pole). Confirm the ring location by confirming that the end of the snuffer bag is about 15cm (6") from the middle spreader bar. The ring should sit at a downward angle (aim it at the tramp edge). Drill a hole using a 3/16" bit.
c) Dry fit the ring, lining up the first hole. Mark the second hole. Drill a hole using a 3/16" bit.
d) Dry fit the ring over the two holes. Insert two rivets. Compress the rivets.
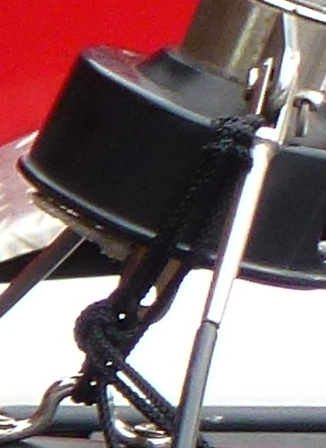
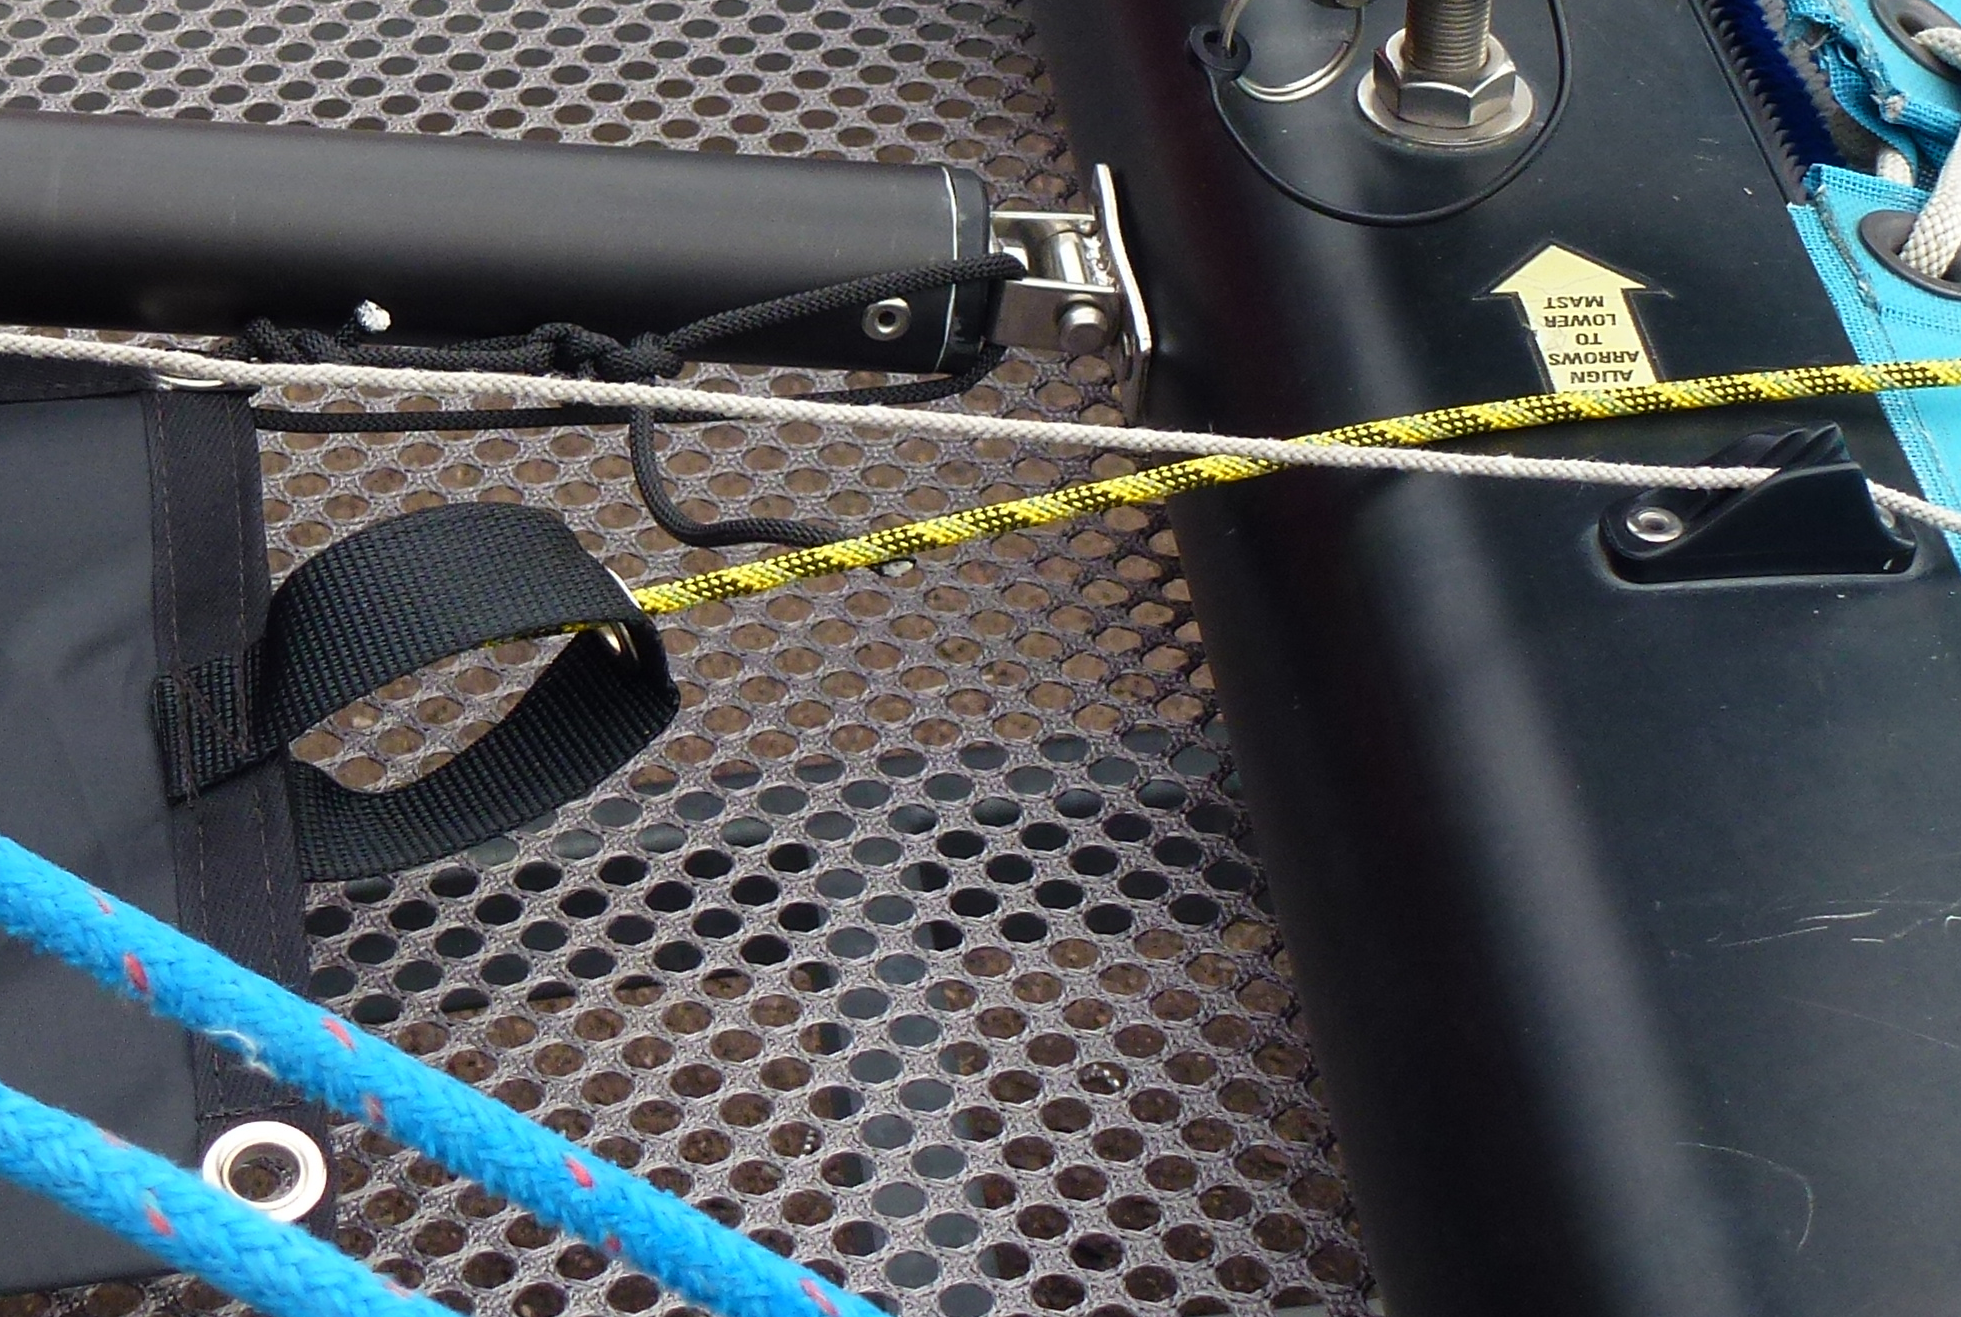
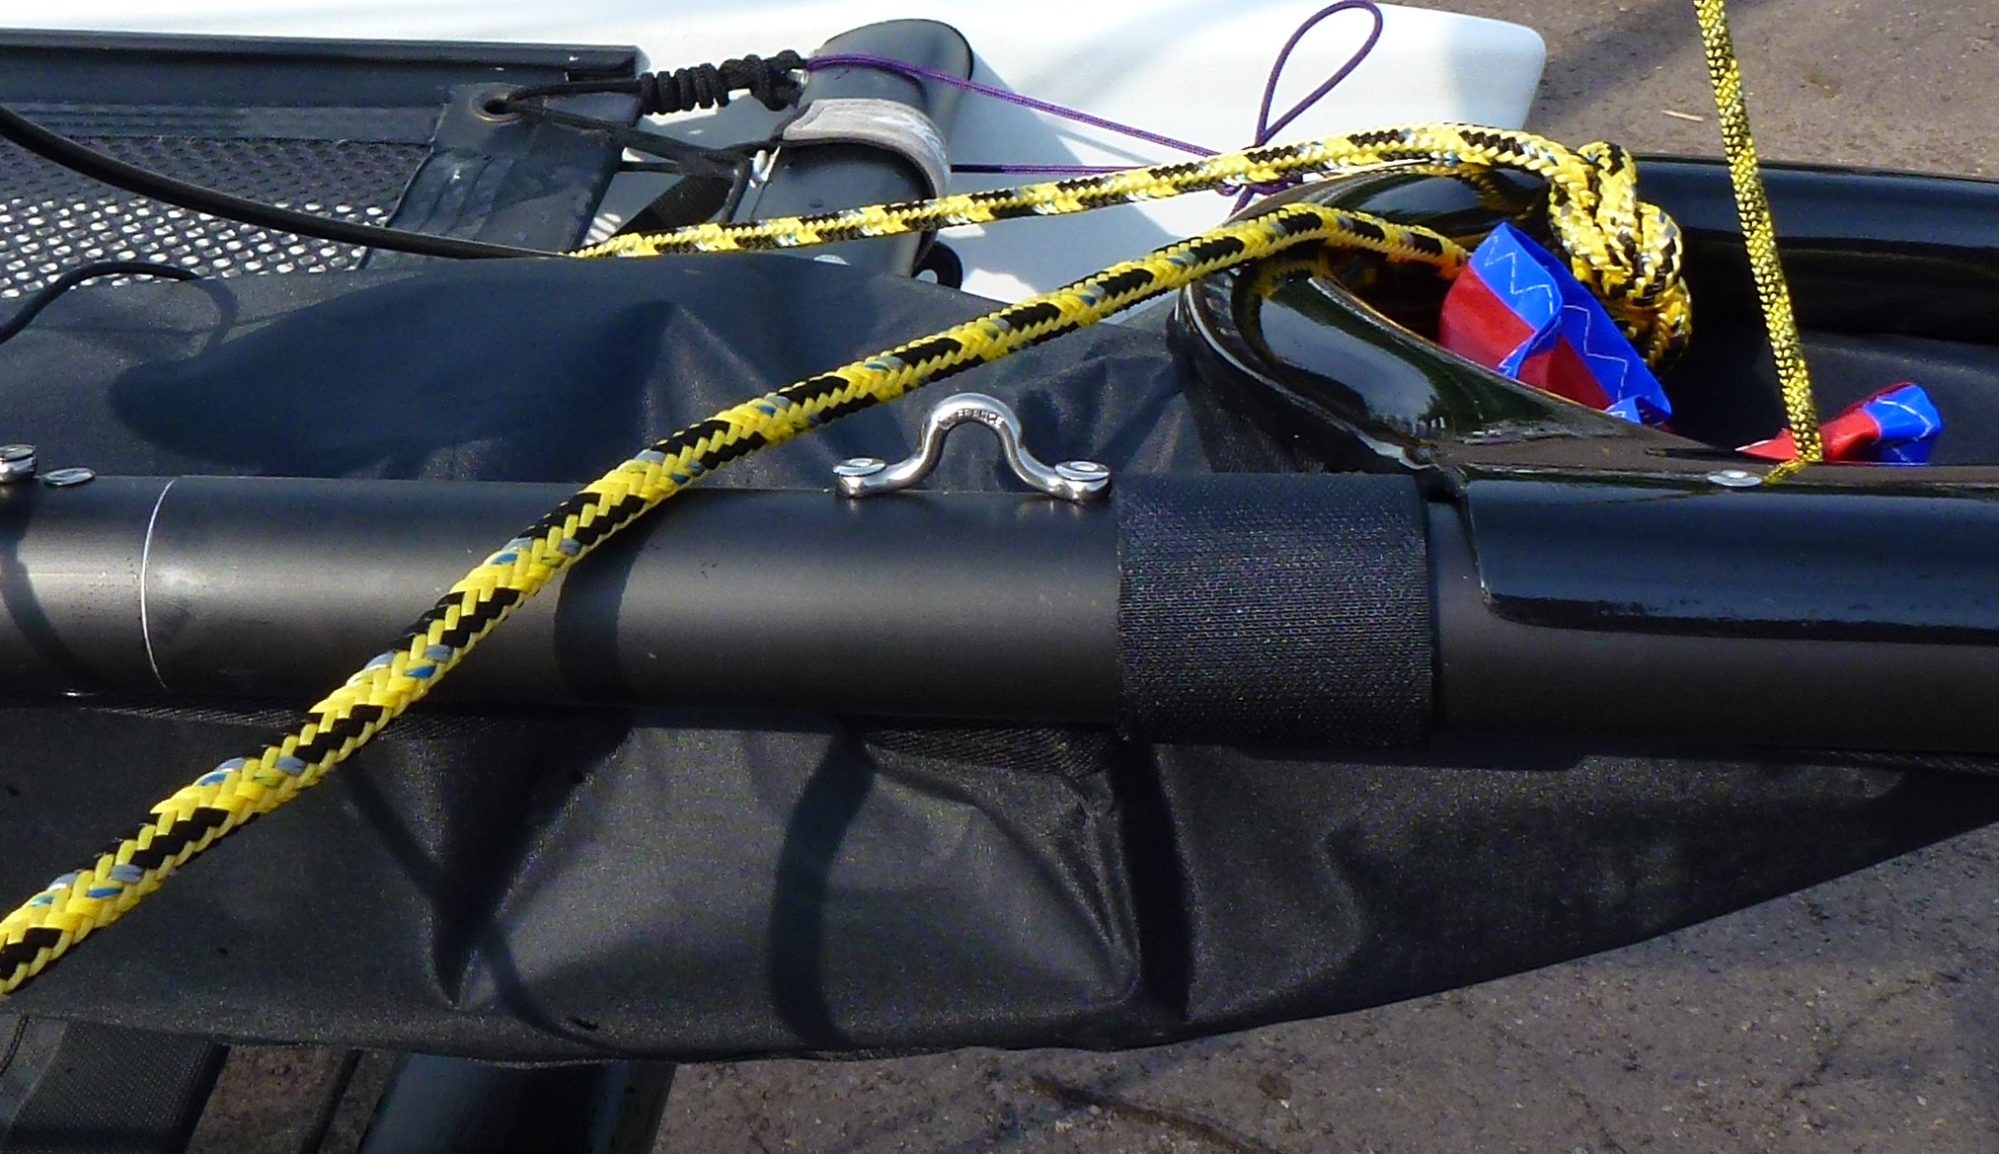
e) Tie the bottom of the snuffer bag to the spin pole bracket with the 70cm black cord (part 19). See pictures in Step 11.
Step 5: Install Spinnaker Sheet Line Middle Spreader Bar Blocks
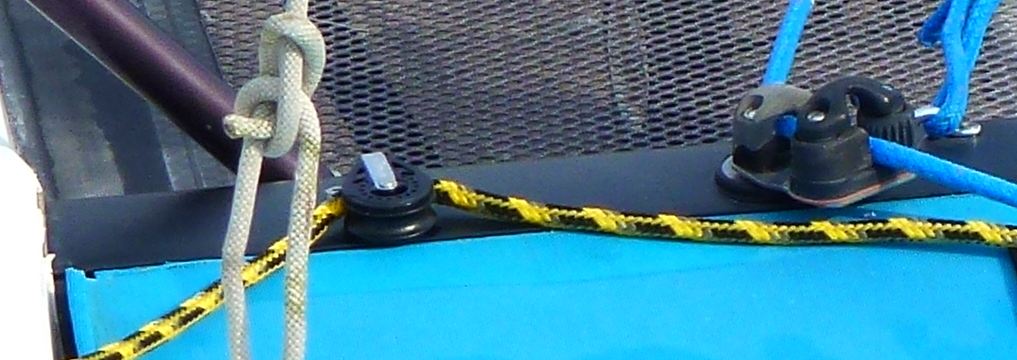
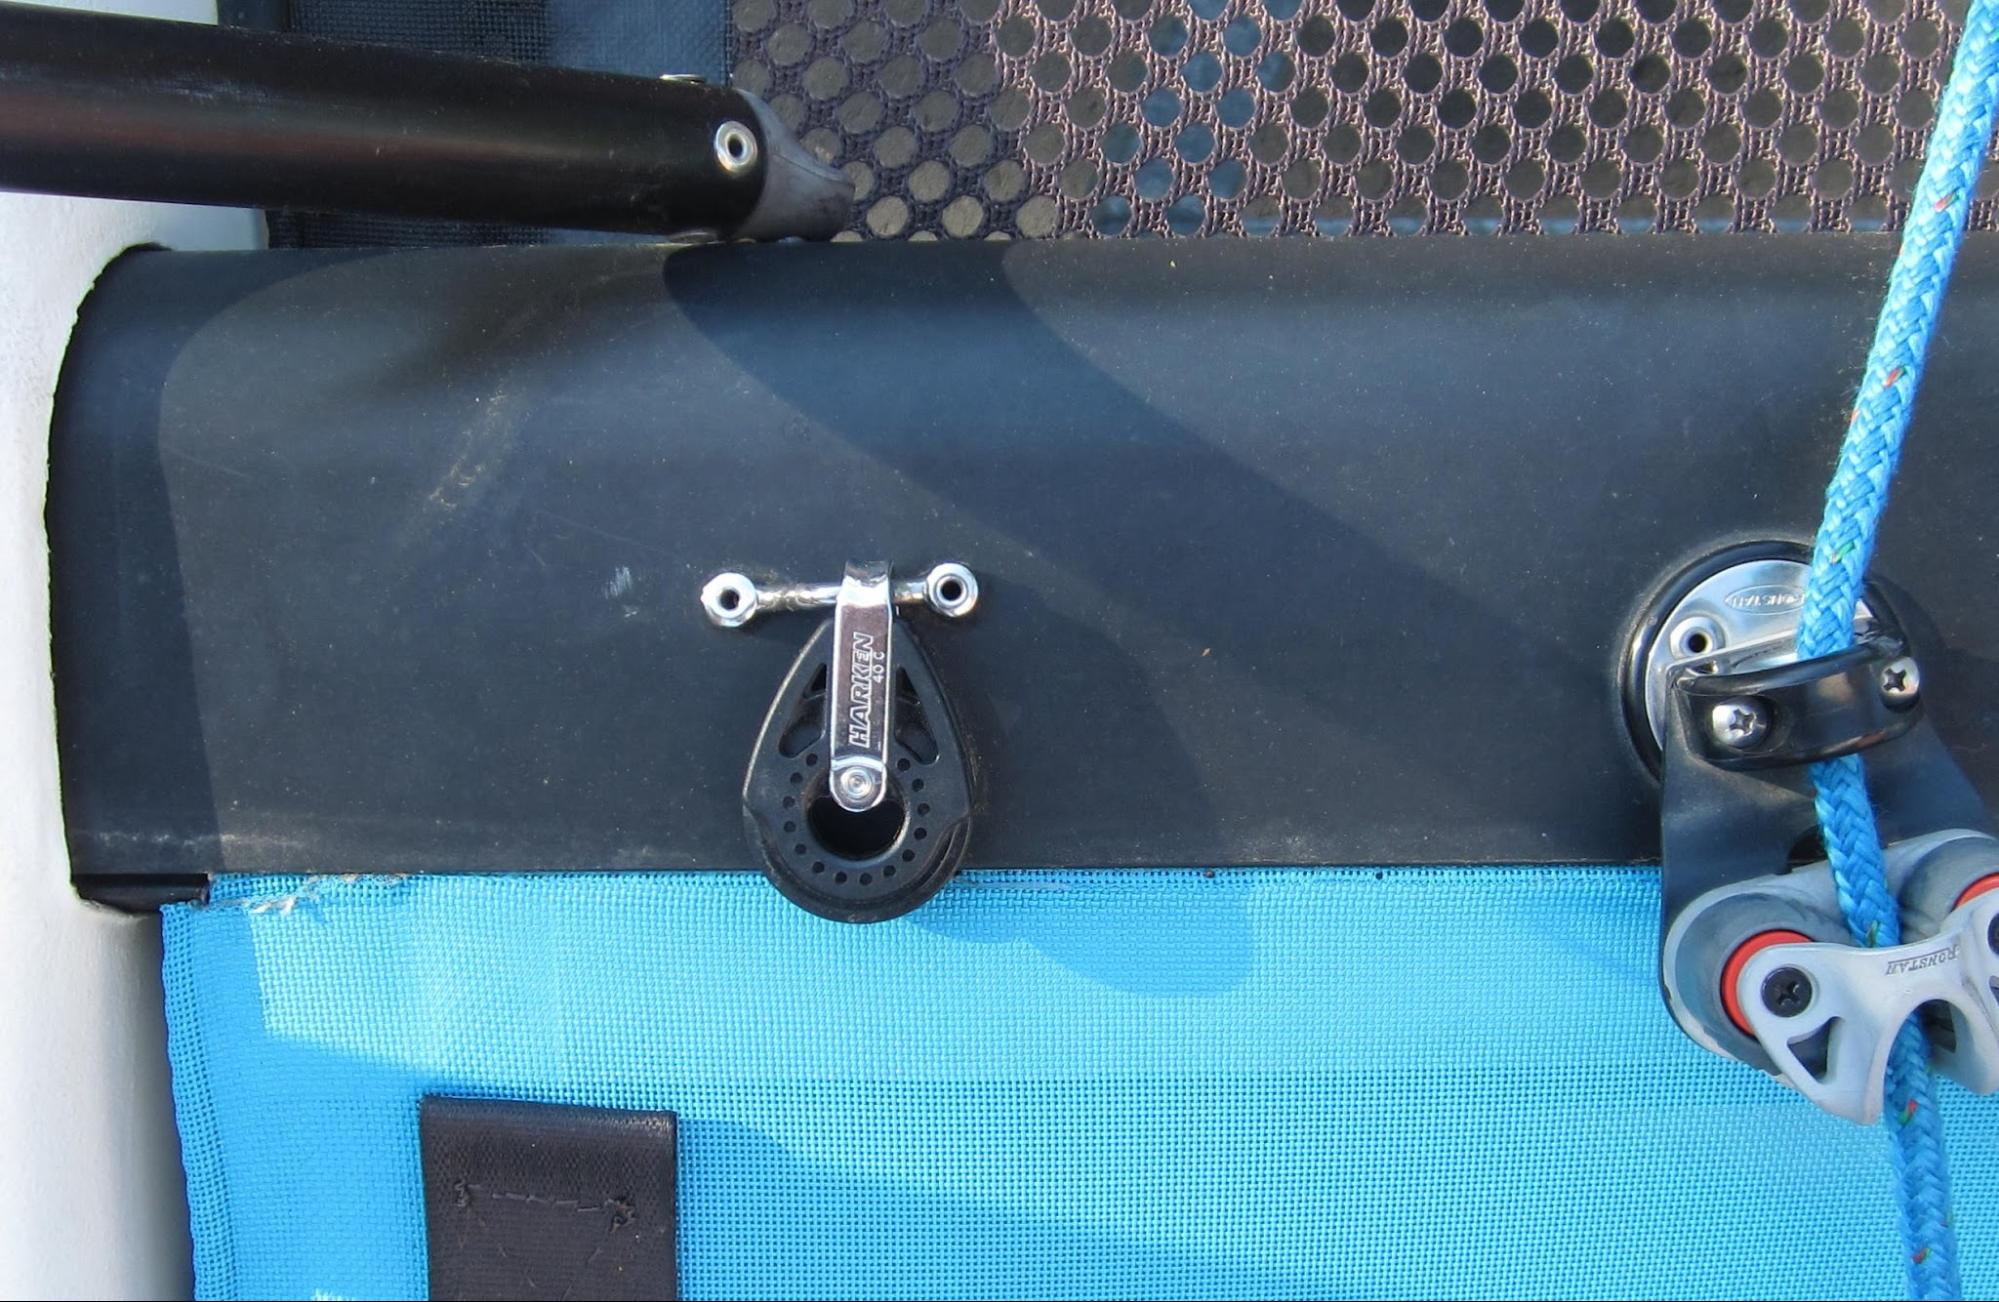
This step mounts a block on the middle spreader bar that is used for the spin sheet line. See parts 34, 38, 40 in parts list.
a) Hold a metal hoop bracket (part 38) on the top of the middle spreader bar, in line with the port wing seat support attachment point. The bracket should be parallel to the spreader bar. The mast-side hole of the metal hoop bracket should be about 16cm from the pontoon, and about 5cm from the front tramp edge of the spreader bar.
b) Drill the two holes using a 3/16" bit.
c) Insert the spin sheet block (part 34) under the metal hoop (note: not the ratchamatic block). Insert two rivets (part 40) through the metal hoop bracket. Compress the rivets.
d) Repeat (a) to (c) for the starboard side.
Note: Spend time to align the hoop bracket parallel to the spreader bar.
Step 6: Install Halyard Cam Cleat
This step mounts the spinnaker halyard cam cleat onto the middle spreader bar. See parts 25 to 29 in the parts list.
a) One of the four cam cleat base holes exits on the flat part of the base bottom instead of the curved part (see Figure 1). Use this hole to attach the cam cleat to its base with a flat head stainless steel bolt (#8-32x1") and locking nut (neither is supplied).
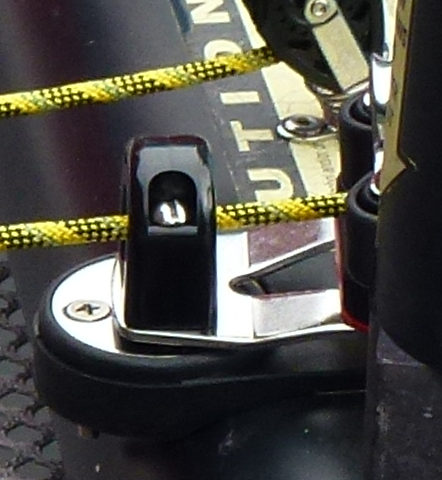 b) Dry mount the cam cleat base on the bow side of the middle spreader bar, on the starboard side of the mast post. There should be about 10.5cm (4 1/8") between the centre of the mast post and the port edge of the cam cleat base. Confirm that the port side of the bracket aligns with the port edge of the Hobie Caution sticker.
c) Locate the hole on the stern side of the cam cleat base (thinnest part of the base). While holding the base in place, use a drill and a 3/16" bit to widen the hole in the base and drill a hole into the spreader bar. Insert a 1.0cm (3/8") rivet (part 28) into the hole. Compress the rivet.
d) Use a drill and a 3/16" bit to drill the port and starboard holes for the cam cleat. Insert a 1.9cm (3/4") rivet (Part 27) into the hole, and a second long rivet into the other hole (not supplied; I used a 1.6cm aluminium rivet that felt like tissue paper compared to the rock hard rivets supplied with the kit). Compress both rivets.
Note: Holes drilled here will hit an inner bar. Be prepared to drill into the inner bar.
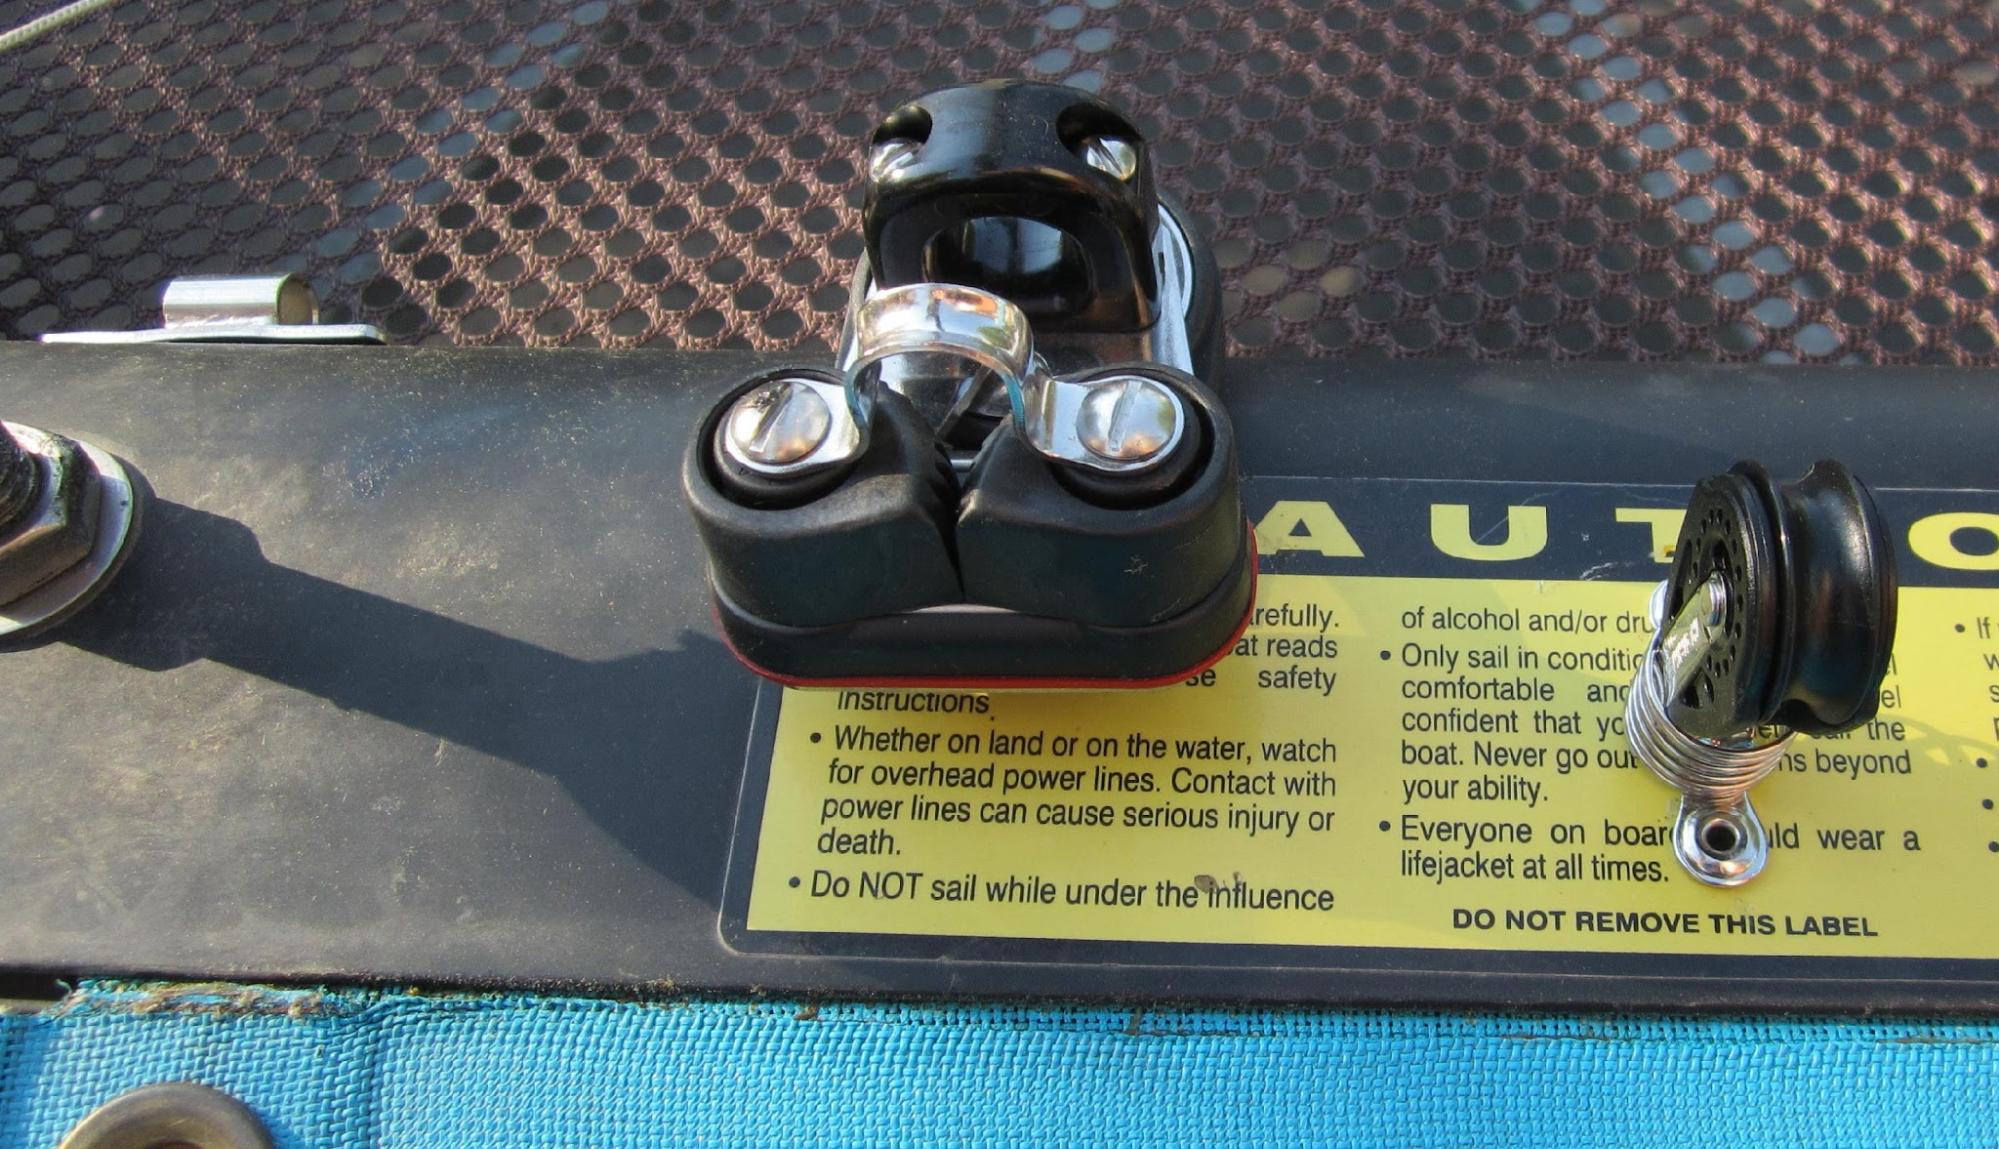
Step 7: Install Halyard Spring Block
This step mounts the spinnaker halyard block onto the middle spreader bar. See parts 31 and 40 in the parts list.
a) Dry mount the spring block on the middle spreader bar, on the starboard side of the mast post. There should be about 22.5cm (8.75") between the centre of the mast post and the centre of the spring block base holes (in line with the "T" in the Hobie Caution sticker). The block bracket should align bow to stern. Mark the two holes.
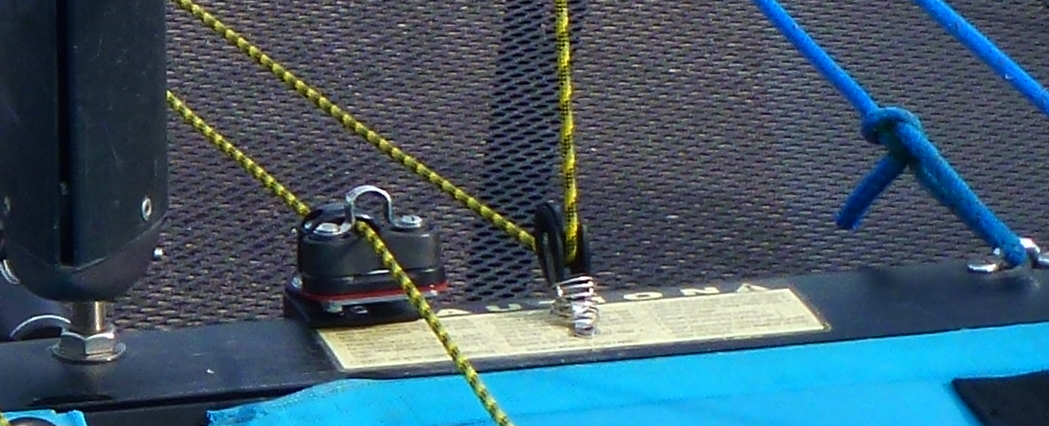 b) Drill the two holes using a 3/16" bit.
c) Insert two 1.4cm rivets (part 40). Compress the rivets.
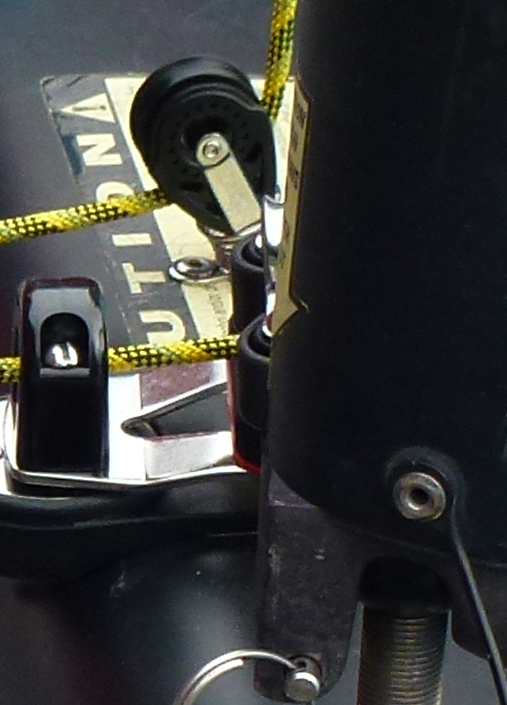 SECTION D: HARDWARE ASSEMBLY (No drill required)
Step 8: Attach Spin Pole
This step attaches the spin pole. See parts 8 and 10 in the parts list.
a) Attach the spin pole to the middle spreader bar spin pole bracket.
b) Attach the spin pole middle hoop bracket to the furler base using a length of cord (part 10), and a shackle (not supplied) for easy removal.
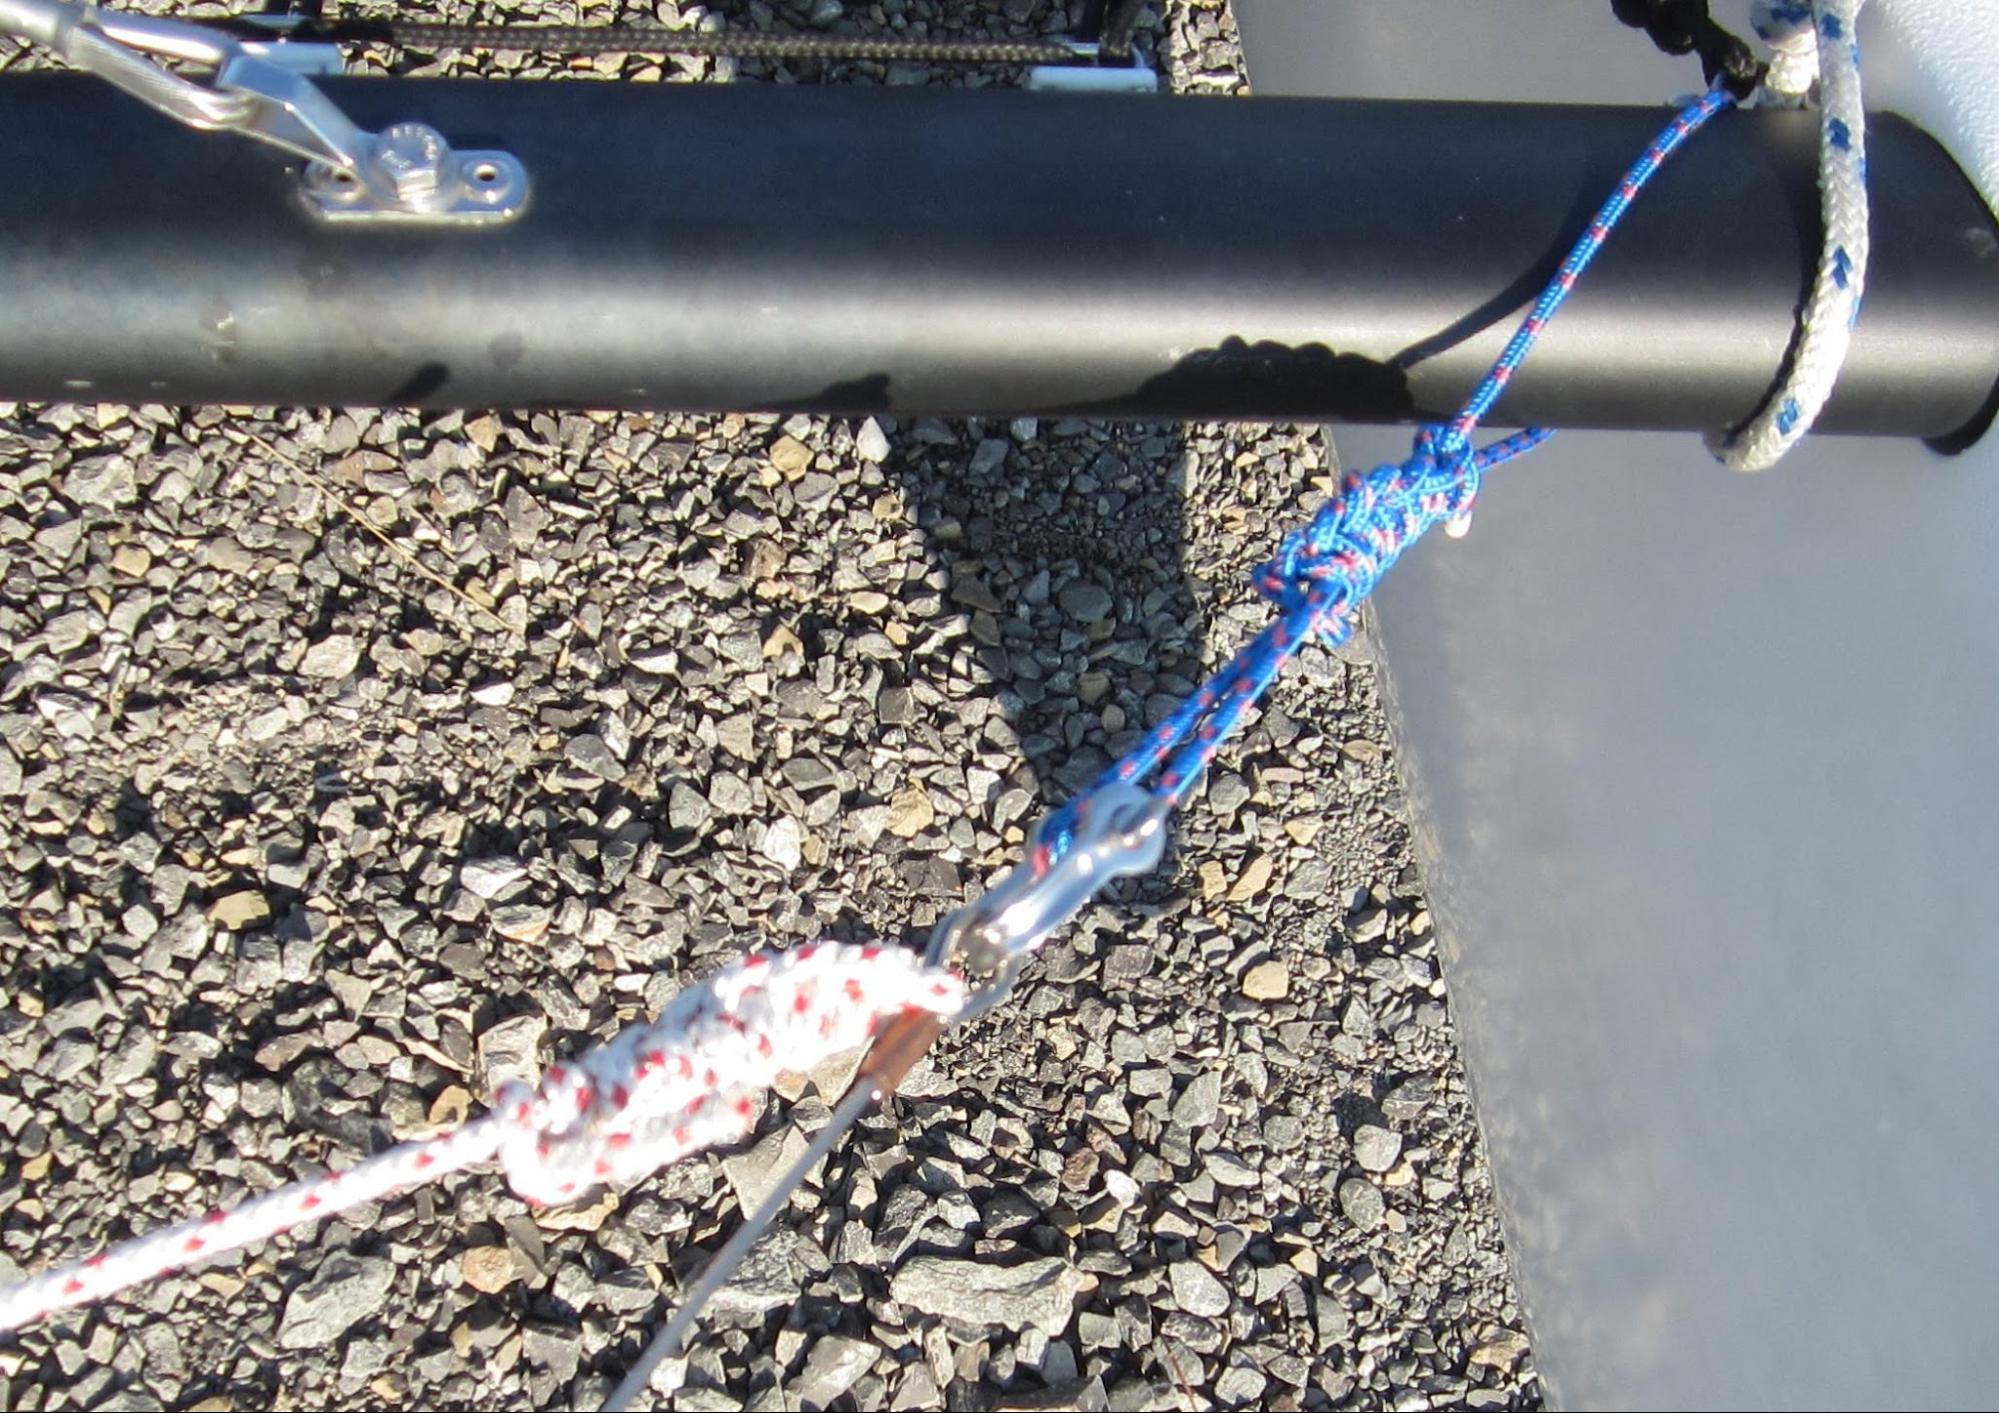
c) Attach the bridle wires to the ends of the bow spreader bar. The H16 bridle wires are not long enough. Use some line (not provided) to tie them to the spreader bar. Use the existing hoop brackets that are used to hold the corners of the front tramp. For easy removal, use a shackle (not supplied) on each side.
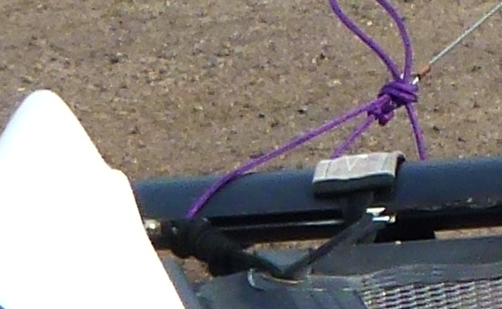
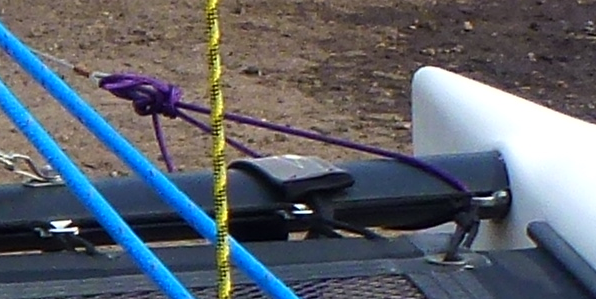
d) Ideally, the spin pole ring would be mounted horizontal, but it will rotate down from the weight. Also, when launching and retrieving the spinnaker, the hoop will try to lift up. To reduce the lift up, take a small line and tie it to the spin pole just in front of the ring and have the line go into the track where the bag enters the hoop and tie that to the bridle connection on the port end of the front spreader bar.
Step 9: Attach Side Stay Spin Sheet Blocks
This step attaches spin sheet blocks to the side stays. See parts 21 and 35 in the parts list.
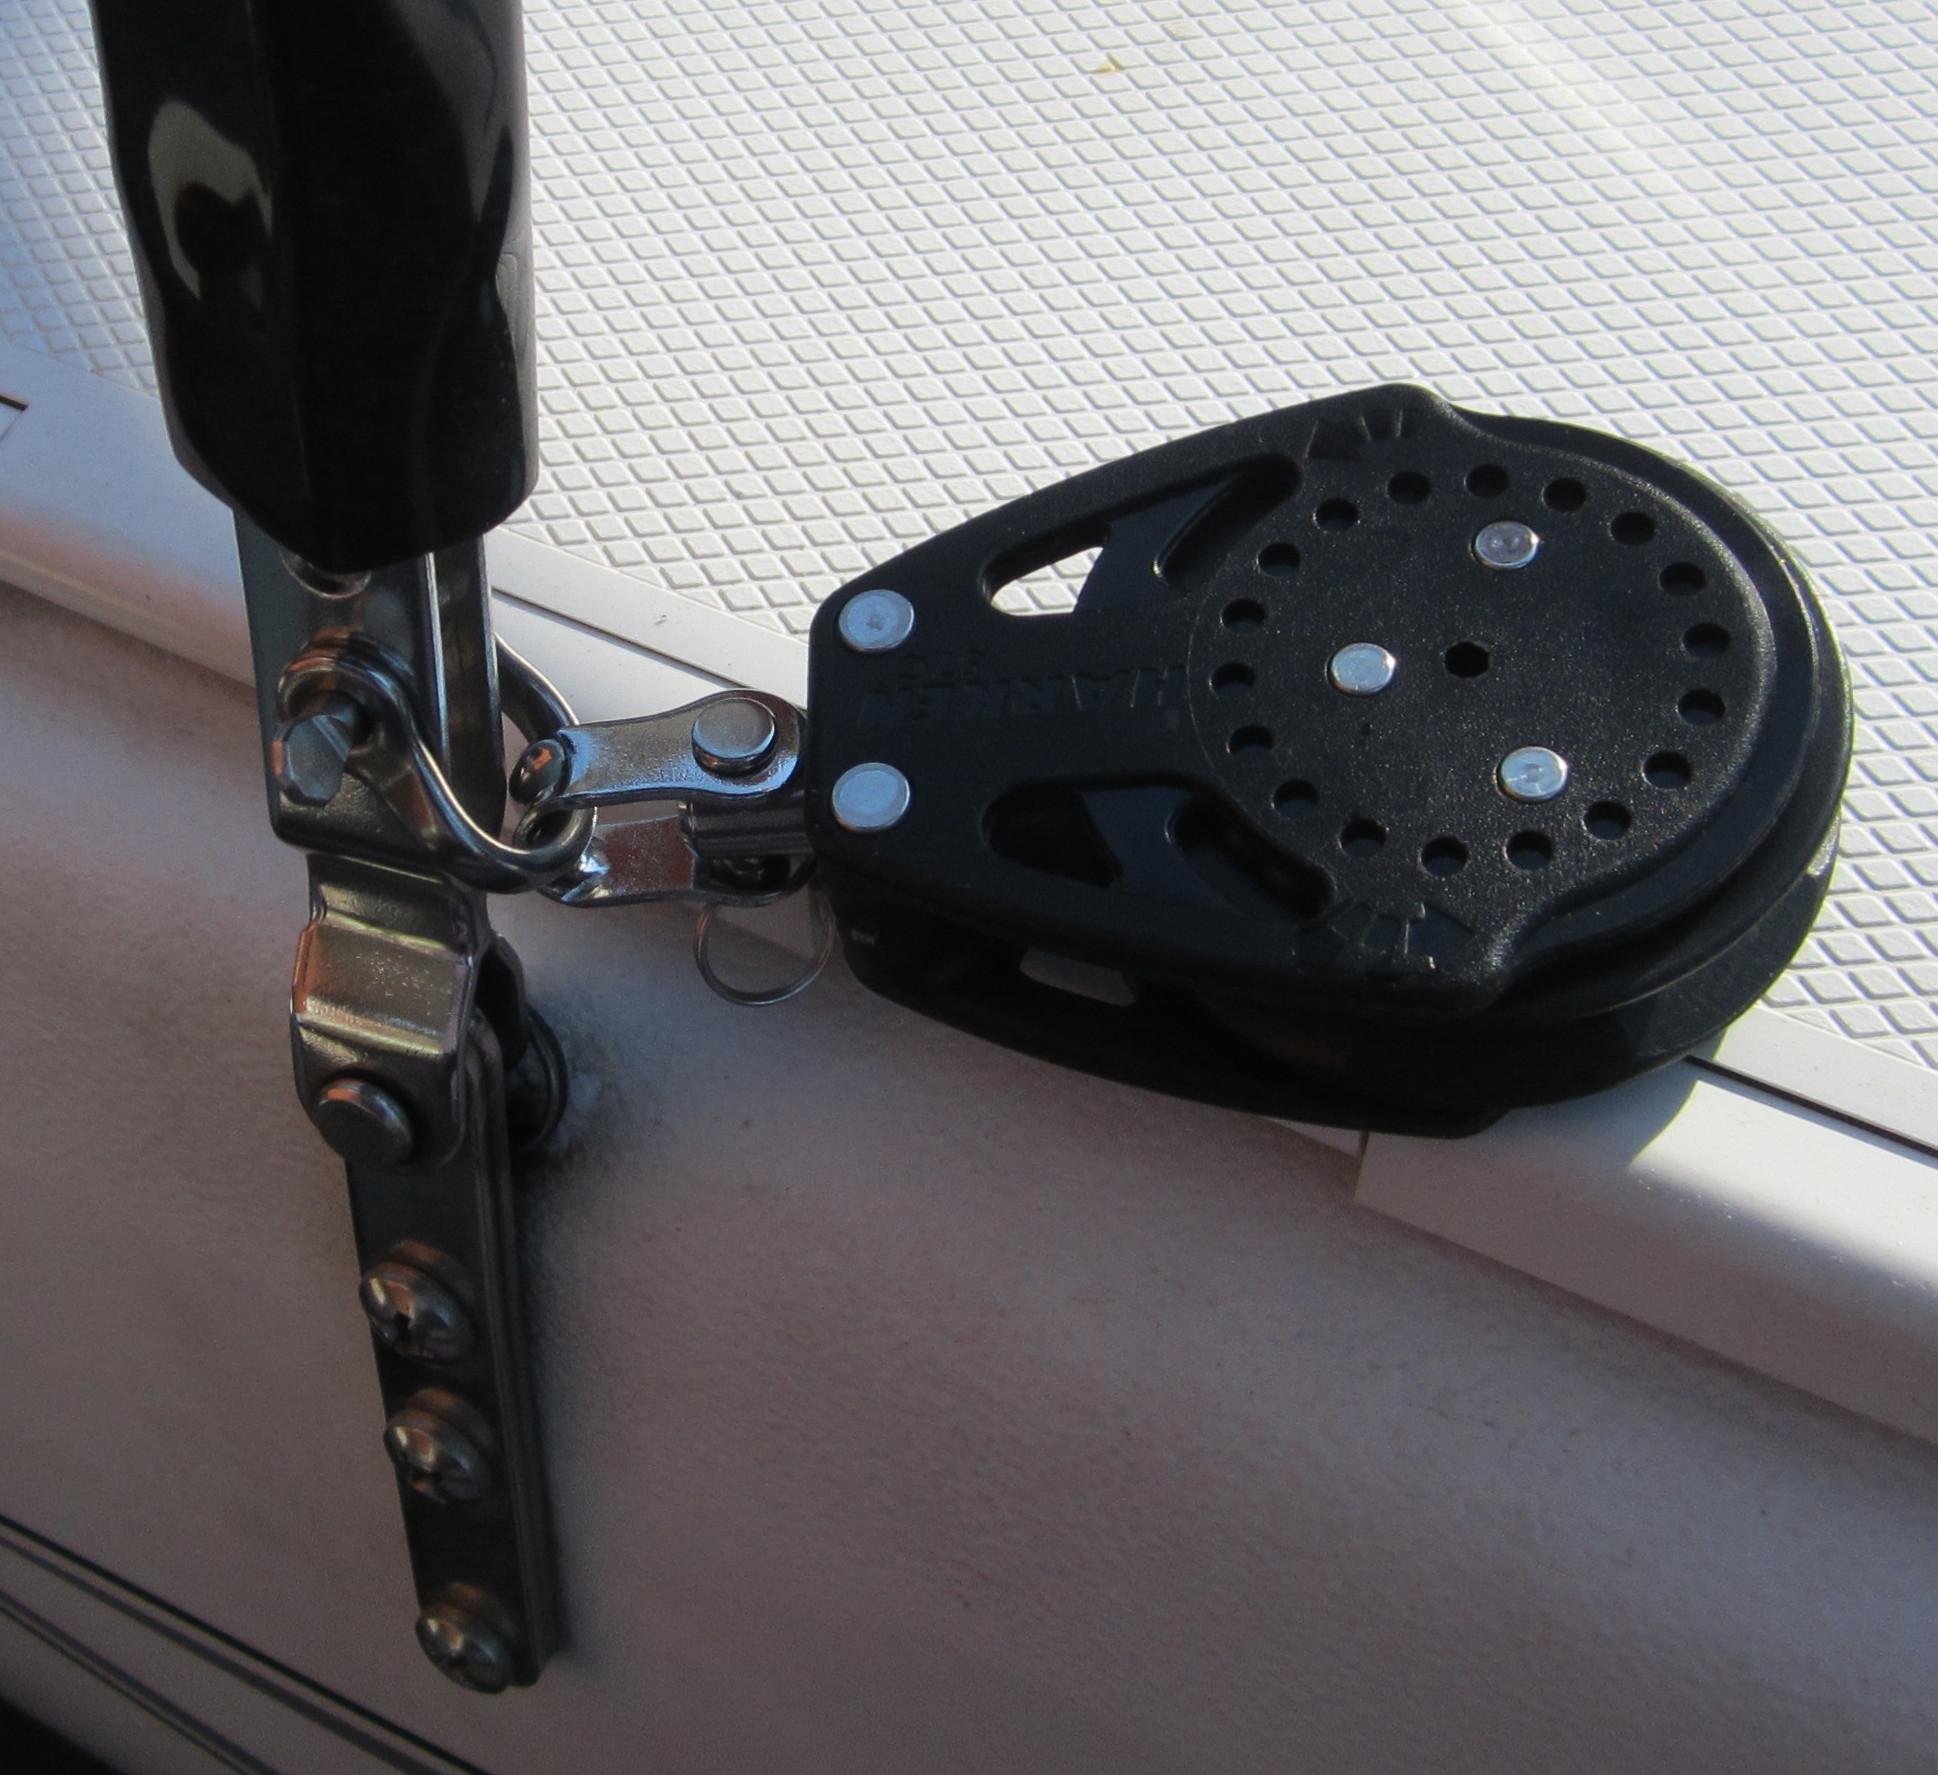
a) Use a shackle to attach a carbo ratchamatic block (57C) (part 35) to the port side stay.
b) Repeat for the starboard stay.
Step 10: Attach Stern Spreader Bar Halyard Block
This step attaches a block to the stern spreader bar. It helps keep the spinnaker halyard straight when hoisting and dousing. See part 24 in the parts list.
a) Using the block with the attached bungee cord, tie the bungee cord to the stern spreader bar (or main tramp middle lashing cord). Use a shackle (not supplied) for easy adjustment.
SECTION E: RIGGING
These steps install the tack line, halyard, sheet line, and spinnaker sail.
Step 11: Attach Halyard
This step rigs the spinnaker halyard line. See part 3.
a) Tie one end to the head of the spinnaker.
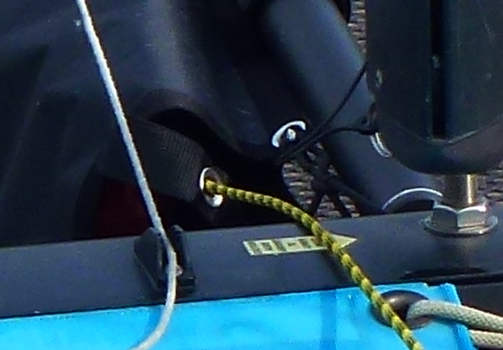
c) Thread the spin halyard:
1) through the halyard spring block on the middle spreader bar,
2) then through the block to block set (part 23),
3) then through the halyard cam cleat on the middle spreader bar,
4) then through the bungee halyard block on the stern spreader bar (or tramp),
5) then through the hole in the strap in the bottom of the snuffer bag,
6) then through the bottom of the snuffer bag,
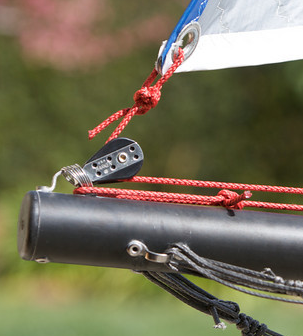
7) then out the snuffer bag ring,
8) then through the ring 1/4 the way up the sail,
9) then through the ring 1/2 the way up the sail,
10) then through the hole 3/4 the way up the sail, and tie a figure eight knot.
d) When the sail is removed from the boat for storage, tie the halyard to the spin pole ring.
Step 12: Attach Sheet Line
This step rigs the spinnaker sheet line. See part 7 in parts list.
a) Attach one end of the spinnaker sheet line (part 7) to the clew of the spinnaker sail.
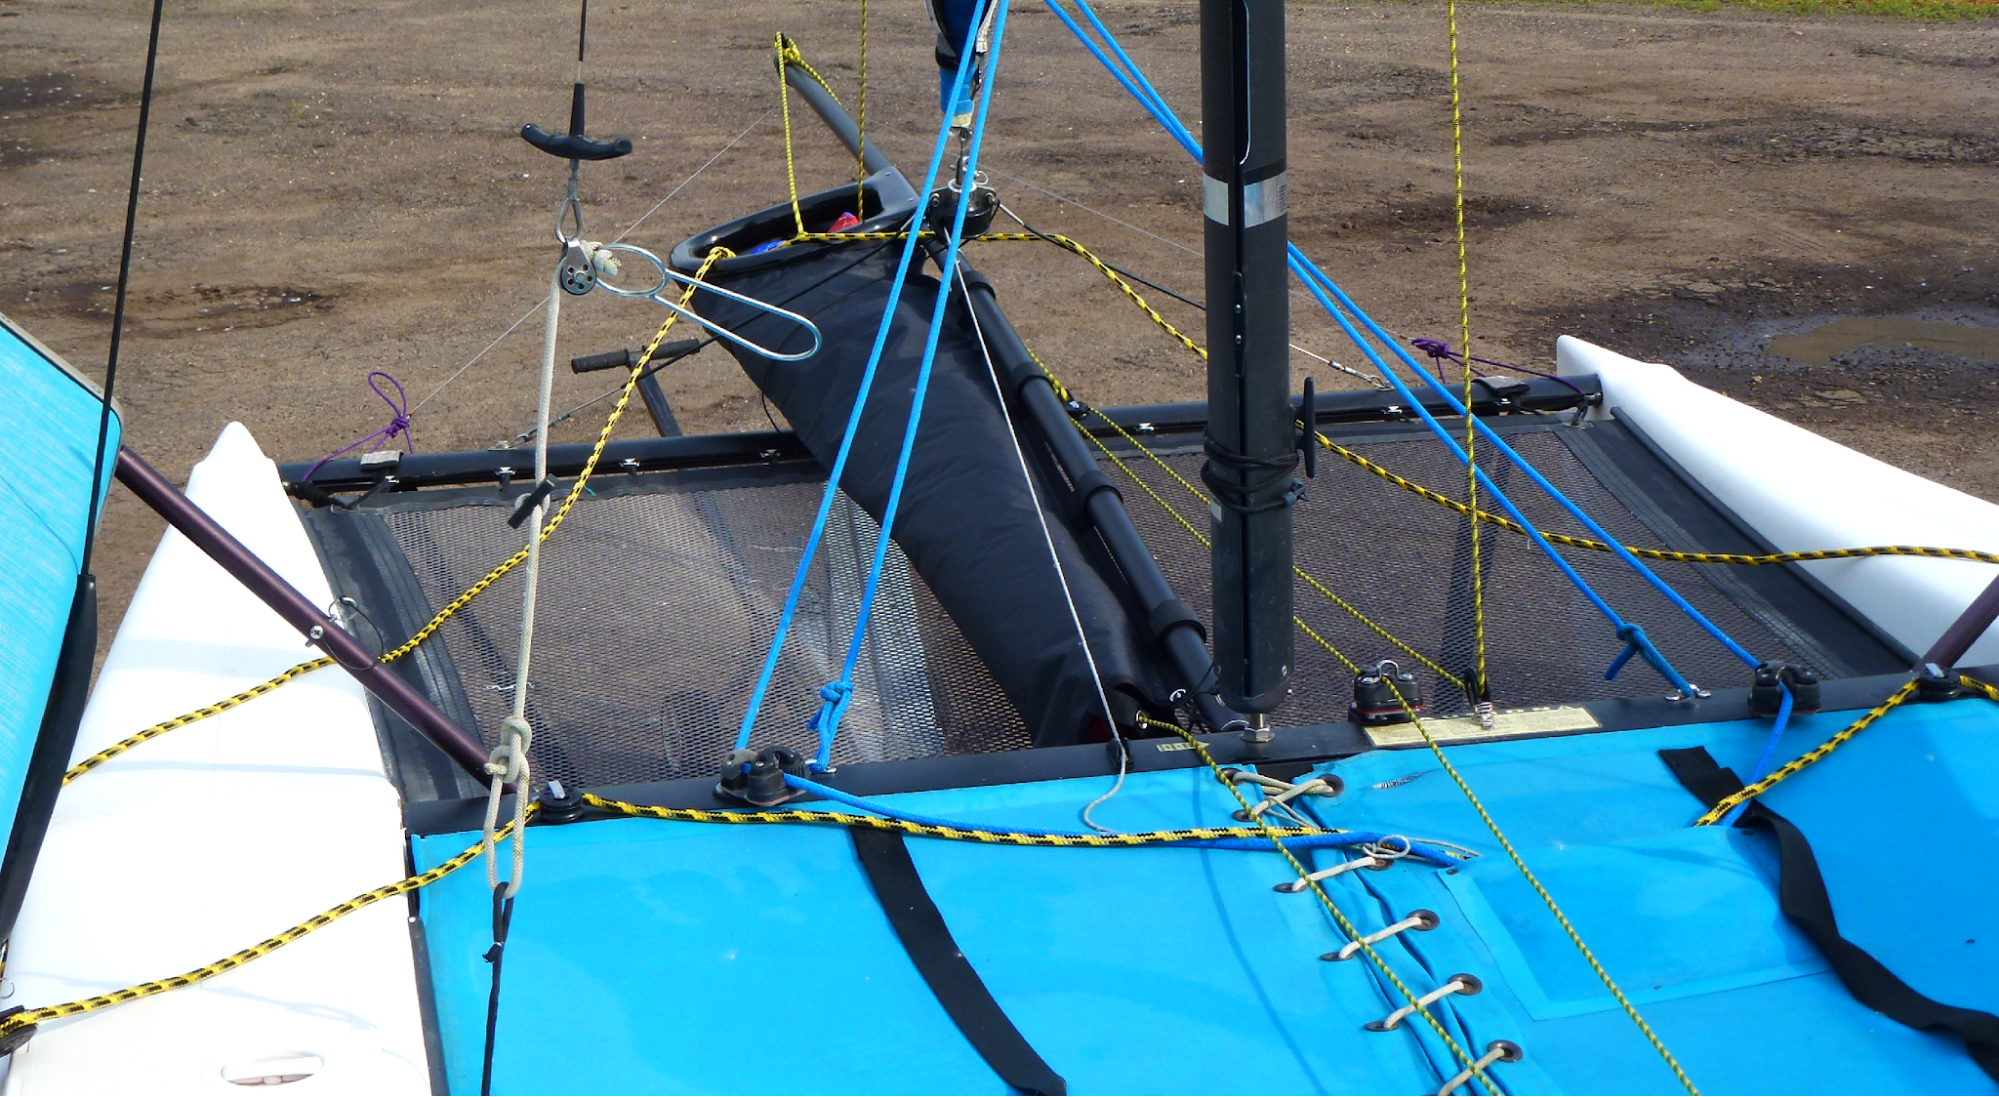
b) Thread the other end of the spin sheet line:
1) over the port pontoon, down the outside of the boat,
2) then through the port stay sheet block,
3) then through the port middle spreader bar sheet block,
4) then through the starboard middle spreader bar sheet block (passing on the stern side of the mast),
5) then through the starboard stay sheet block,
6) then under the wing seat, to the outside of the starboard pontoon,
7) then tie it to the clew of the spinnaker sail (same hole where the other end is tied).
Step 13: Attach Tack Line
This step rigs the spinnaker tack line. See part 5 in parts list.
a) Tie one end of the spinnaker tack line to the tack of the spinnaker sail.
b) Thread the other end of the spin tack line:
1) through the block on the bow end of the spinnaker pole,
2) then through the open half of the block to block set (filled half contains halyard),
c) Pull the tack line until the halyard is taut, then tie the tack line to the metal hoop bracket at the bow (block) end of the spinnaker pole.
SECTION F: SAILING
a) The secret to using the snuffer is to use the halyard to pull the spinnaker into the snuffer. Just give a tug when it hits the snuffer ring. When pulled in with the halyard, it pulls out very nicely.
b) My only disappointment is the "locking" carbo ratchamatic blocks. They will lock in my hand, but even on the lightest setting, I have yet to have these things lock while sailing. IMHO, this kit needs a pair of cam cleats for the spin sheet line.
SECTION G: IMPORTANT UPDATE
After a season of sailing with the Hobie 16 spin on my Getaway, I have a few more thoughts to add on this topic. I plan to update this document this winter with updated text and a few new pictures, but for now here is my short to-do list for these instructions.
a) Add to Section F; Sailing. On a medium to heavy wind, snugly sheet in the main sail. It acts as a backstay and stops the mast from bending too far forward.
b) The spin sail rips really really easily. I put four holes in my new spin in the first few months. I eventually figured out that the rings holding my cotter pins just below my furling reel were poking holes in my spin. I duct taped over everything sharp-ish below my front stay roller furling, down to my front spreader bar. After the duct tape was added in June, I didn't have any more holes in my spin. Luckily, spin sheet repair tape comes in the exact same red as my spin.
c) The spin pole bag/sock is kinda crap. The part that has not been covered by my boat tarp is very faded. And out of the blue, I have a hole in it! This thing should be bullet proof. I am disappointed in the spin bag, but it should last a few years. I have a sexy patch of duct tape over my spin bag hole.
d) Spin pole pre-bend. The spin will pull up on the spin pole. To prepare for this, the front stays of the spin pole should be tight enough to pre-bend the spin pole in a downward direction. Without pre-bend, the spin pole takes on a dangerous up-bend in a medium or heavy wind.
e) Height of spin mast tang is not correct. According to other spin sailors, the luff of the spin should be pulled to a tight straight line when sailing a broad reach. When my spin is pulled up to the mast tang block, my spin luff is not tight. It needs about another 23cm of length, which means that my spin mast tang is too low by about xx cm. Crap!!!
f) Side stay spin sheet blocks. Hmm.... I flew my spin in a medium wind the other day. The side stay spin sheet blocks really bent my side stays at the bottom. That cannot be healthy for my side stays. The location also does not seem to give enough down pull on the spin. I think I might move the block from the side stay to the base of the front outer wing seat pole.
g) Holding the spin sheet by hand is not comfortable. I am considering adding a cam cleat to my side spin blocks somehow.
Installing the spinnaker pretty strait forward, but the instructions provided by Hobie are basically useless. The Spinnaker kit is basically the hobie 16 kit with a few extra parts. Fortunately I got a great installation guide written by OttawaDave on the Hobie forums. I thought it might be useful to post the Hobie Getaway spinnaker instructions here.
Hobie Getaway Spinnaker Install Instructions
To install this kit I recommend getting a very good pop rivet gun. The stainless steel rivets are much more difficult to pop then the aluminum rivets from the hardware store. Get yourself one of these.
It took me about 4 hours to complete the install and I didn't get he spinnaker hound mounted as nicely as I would have liked. Here is what the boat looks like with the spinnaker flying.

Full Instructions (reproduced below for easy reading; originally written by OttawaDave, updated 2012-09-25):
SECTION A: INTRODUCTION
This unofficial set of installation instructions was written for a 2009 Hobie Getaway, using a 2012 Hobie Spinnaker Kit 20999020.
Note from the Author: I had never seen this kit before, but with email advice and pictures from three very helpful people, I installed this kit. I drafted these instructions before installation, but this version is after installation, and after sailing with the spinnaker. hall@sandkasel.com
SECTION B: PARTS LIST
1. Spinnaker snuffer bag (black) (Part # ST1007324) - Qty 1
2. Spinnaker snuffer bag ring (black) - Qty 1
3. Sail - Qty 1
4. Sail bag - Qty 1
5. 6mm / 5.5m spinnaker tack line - Qty 1
6. 5mm / 21m spinnaker halyard line - Qty 1
7. 8mm / 12m spinnaker sheet line - Qty 1
8. Spinnaker pole (2 parts) with attached bridle wires - Qty 1. Two parts join to make one pole. Bridle wires connect front of spinnaker pole to ends of front spreader bar. Won't reach for the Getaway, short ropes (not supplied) are needed.
9. Rivets (1.1cm) (7/16") - Qty 2. Used to join the two halves of the spinnaker pole together (only 1 rivet used).
10. 4mm/1m black spinnaker pole support line (not shown in picture) - Qty 1. Used to tie the pole up to the furler drum.
Small Bag #1
11. Hobie 14 mast tang - Qty 1. Attaches to mast above jib mast tang. Used to hold up the spinnaker.
12. Rivets (1.4cm) (9/16") - Qty 6. Rivets and liners are used to attach mast tang to mast.
13. Rivet liners - Qty 6
Small Bag #2
14. Small block - Qty 1. Attaches to spinnaker mast tang, to hold the spinnaker halyard.
15. Shackle - Qty 1
16. Bracket - Qty 1. Not used.
17. Rivets (1.4cm) (9/16") - Qty 2. Not used.
18. Rivet liners - Qty 2. Not used.
19. 70cm black cord - Qty 1. Used to tie narrow end of snuffer bag to spin pole connector bracket (#30).
20. 1m black cord - Qty 1. Not used.
Note 1: All rivets are 5mm (3/8") in diameter.
Note 2: All rivets are much harder to install than regular aluminium rivets. Prepare to squeeze very very hard on your rivet gun.
Small Bag #3
21. Shackles - Qty 2. Used to attach blocks to the side stays.
22. Screw - Qty 1. Not used.
23. Block to block set (29C) - Qty 1. Used to connect the halyard to the tack line.
24. Block with 70cm bungee cord - Qty 1. Used to connect the spin halyard line to the stern spreader bar.
Small Bag #4
25. Cam cleat - Qty 1. Used to hold the spinnaker halyard.
26. Cam cleat base - Qty 1
27. Long rivet (1.9cm) (3/4") - Qty 1. Used to attach the cam cleat.
28. Short rivet (1.0cm) (3/8") - Qty 1. Used to attach the cam cleat.
29. Screws - Qty 2. Not used.
Small Bag #5
30. Spin pole connector bracket - Qty 1. Connects the spinnaker pole to middle spreader bar.
31. Spring block (29C) - Qty 1. Installs beside cam cleat on middle spreader bar. Holds spin halyard.
32. Spring block base plate - Qty 1. Not used. Intended for H16 tramp installation.
33. Bolts, washer, nuts - Qty 2
34. Blocks (40C) - Qty 2. Installed with metal hoop brackets and rivets on middle spreader bar to hold spin sheet line.
35. Carbo ratchamatic blocks (57C) - Qty 2. Connects to the side stay to hold the spin sheet line.
36. Allen key - Qty 2. Adjusts the block ratchet.
37. Small block - Qty 1. Not used.
38. Metal hoop bracket - Qty 5. Only 3 of 5 used.
39. Plastic hoop bracket - Qty 1. Not used.
40. Rivets (1.4cm) (9/16") - Qty 14. Only 13 of 14 used.
These steps require a drill and a good rivet gun.
Step 1: Install Spinnaker Mast Tang
This step mounts the bracket that holds the spinnaker up the mast. See parts 11-13 in the parts list.
a) Mark the location for the bracket. The bracket needs to be installed 153cm (60") above the jib mast tang. Measure from the centre of the top shackle hole on each tang.
b) Dry fit the mast tang. Bend the mast tang until it fits snugly without gaps. (Note: This step took me an hour!)
c) Clamp the mast tang in place as a drill guide, then drill the six holes using a 3/16" bit. Remove the mast tang. Enlarge the holes using a 7/32" bit.
d) Install the six rivet liners into the holes. Then fit the mast tang so that it lines up over the rivet liners. Insert all six rivets before compressing the first rivet because the bracket will likely move, and the holes will cease to align, if you don't.
e) While holding the mast tang firmly in place, compress the lower front rivets using a rivet gun. After the two front rivets are compressed, compress the next highest rivets until all six are compressed.
f) Attach the mast halyard block (part 14) to the spinnaker mast tang using a shackle (part 15). Thread the spinnaker halyard (part 16) through the halyard mast block, and secure both ends to the boat. Raise the mast.
Step 2: Install Spinnaker Pole Bracket
This step mounts the bracket that is used to hold the spinnaker pole to the middle spreader bar. See parts 30 and 40 in the parts list.
a) Hold the spin pole bracket on the bow side of the middle spreader bar, directly in front of the mast ball post. Temporarily clamp something long to the bracket to ensure that it is parallel to the spreader bar. Mark the holes.
b) Drill the two holes using a 3/16" bit.
c) Insert the two rivets (part 40). Compress the rivets.
Step 3: Connect Spin Pole Halves and Install Front Stay Bracket
This step connects the two halves of the spin pole together, and installs the metal hoop that holds the pole to the front stay. See parts 8, 9, 38 and 40 in the parts list.
a) Dry fit the two halves of the spin pole together. Connect the spin pole to the spin pole bracket on the middle spreader bar. The drain hole near the bracket end should be on the bottom.
c) Hold the two ends of the pole together. Drill the hole using a 3/16" bit. Be careful not to let the parts slip apart while drilling.
d) Insert a 1.1 cm rivet (part 9). Compress the rivet.
e) Mark a spot 3.5cm from the join point, measuring towards the bracket (spreader bar) end of the spin pole, not the block (front) end. It should be just behind the rivet just inserted (stern side).
f) Dry fit one hole of a metal hoop bracket on the marked spot. Mark the second hole of the metal hoop bracket. Since the holes are about 4cm apart, this second hole should be about 7.5cm from the spin pole join point.
g) Confirm that the location of the metal hoop bracket will place the hoop approximately in line with the front stay (this is why the mast is raised). Drill the two holes using a 3/16" bit.
h) Hold the metal hoop bracket over the two holes. Insert two 1.4cm rivets (part 40). Compress both rivets.
Step 4: Install Spinnaker Pole Ring
This step mounts the snuffer bag ring to the front half of the spin pole. See parts 1, 2, and 40 in the parts list.
a) Attach the snuffer bag to the snuffer bag ring by feeding the cord along the forward end of the bag into the track located on the underside of the hoop.
b) Mark a spot 11cm directly in front of the front rivet of the unused H16 hoop bracket (132cm from the front (block) end of the spin pole). Confirm the ring location by confirming that the end of the snuffer bag is about 15cm (6") from the middle spreader bar. The ring should sit at a downward angle (aim it at the tramp edge). Drill a hole using a 3/16" bit.
c) Dry fit the ring, lining up the first hole. Mark the second hole. Drill a hole using a 3/16" bit.
d) Dry fit the ring over the two holes. Insert two rivets. Compress the rivets.
e) Tie the bottom of the snuffer bag to the spin pole bracket with the 70cm black cord (part 19). See pictures in Step 11.
Step 5: Install Spinnaker Sheet Line Middle Spreader Bar Blocks
This step mounts a block on the middle spreader bar that is used for the spin sheet line. See parts 34, 38, 40 in parts list.
a) Hold a metal hoop bracket (part 38) on the top of the middle spreader bar, in line with the port wing seat support attachment point. The bracket should be parallel to the spreader bar. The mast-side hole of the metal hoop bracket should be about 16cm from the pontoon, and about 5cm from the front tramp edge of the spreader bar.
b) Drill the two holes using a 3/16" bit.
c) Insert the spin sheet block (part 34) under the metal hoop (note: not the ratchamatic block). Insert two rivets (part 40) through the metal hoop bracket. Compress the rivets.
d) Repeat (a) to (c) for the starboard side.
Note: Spend time to align the hoop bracket parallel to the spreader bar.
Step 6: Install Halyard Cam Cleat
This step mounts the spinnaker halyard cam cleat onto the middle spreader bar. See parts 25 to 29 in the parts list.
a) One of the four cam cleat base holes exits on the flat part of the base bottom instead of the curved part (see Figure 1). Use this hole to attach the cam cleat to its base with a flat head stainless steel bolt (#8-32x1") and locking nut (neither is supplied).
c) Locate the hole on the stern side of the cam cleat base (thinnest part of the base). While holding the base in place, use a drill and a 3/16" bit to widen the hole in the base and drill a hole into the spreader bar. Insert a 1.0cm (3/8") rivet (part 28) into the hole. Compress the rivet.
d) Use a drill and a 3/16" bit to drill the port and starboard holes for the cam cleat. Insert a 1.9cm (3/4") rivet (Part 27) into the hole, and a second long rivet into the other hole (not supplied; I used a 1.6cm aluminium rivet that felt like tissue paper compared to the rock hard rivets supplied with the kit). Compress both rivets.
Note: Holes drilled here will hit an inner bar. Be prepared to drill into the inner bar.
Step 7: Install Halyard Spring Block
This step mounts the spinnaker halyard block onto the middle spreader bar. See parts 31 and 40 in the parts list.
a) Dry mount the spring block on the middle spreader bar, on the starboard side of the mast post. There should be about 22.5cm (8.75") between the centre of the mast post and the centre of the spring block base holes (in line with the "T" in the Hobie Caution sticker). The block bracket should align bow to stern. Mark the two holes.
c) Insert two 1.4cm rivets (part 40). Compress the rivets.
Step 8: Attach Spin Pole
This step attaches the spin pole. See parts 8 and 10 in the parts list.
a) Attach the spin pole to the middle spreader bar spin pole bracket.
b) Attach the spin pole middle hoop bracket to the furler base using a length of cord (part 10), and a shackle (not supplied) for easy removal.
c) Attach the bridle wires to the ends of the bow spreader bar. The H16 bridle wires are not long enough. Use some line (not provided) to tie them to the spreader bar. Use the existing hoop brackets that are used to hold the corners of the front tramp. For easy removal, use a shackle (not supplied) on each side.
d) Ideally, the spin pole ring would be mounted horizontal, but it will rotate down from the weight. Also, when launching and retrieving the spinnaker, the hoop will try to lift up. To reduce the lift up, take a small line and tie it to the spin pole just in front of the ring and have the line go into the track where the bag enters the hoop and tie that to the bridle connection on the port end of the front spreader bar.
Step 9: Attach Side Stay Spin Sheet Blocks
This step attaches spin sheet blocks to the side stays. See parts 21 and 35 in the parts list.
a) Use a shackle to attach a carbo ratchamatic block (57C) (part 35) to the port side stay.
b) Repeat for the starboard stay.
Step 10: Attach Stern Spreader Bar Halyard Block
This step attaches a block to the stern spreader bar. It helps keep the spinnaker halyard straight when hoisting and dousing. See part 24 in the parts list.
a) Using the block with the attached bungee cord, tie the bungee cord to the stern spreader bar (or main tramp middle lashing cord). Use a shackle (not supplied) for easy adjustment.
SECTION E: RIGGING
These steps install the tack line, halyard, sheet line, and spinnaker sail.
Step 11: Attach Halyard
This step rigs the spinnaker halyard line. See part 3.
a) Tie one end to the head of the spinnaker.
c) Thread the spin halyard:
1) through the halyard spring block on the middle spreader bar,
2) then through the block to block set (part 23),
3) then through the halyard cam cleat on the middle spreader bar,
4) then through the bungee halyard block on the stern spreader bar (or tramp),
5) then through the hole in the strap in the bottom of the snuffer bag,
6) then through the bottom of the snuffer bag,
7) then out the snuffer bag ring,
8) then through the ring 1/4 the way up the sail,
9) then through the ring 1/2 the way up the sail,
10) then through the hole 3/4 the way up the sail, and tie a figure eight knot.
d) When the sail is removed from the boat for storage, tie the halyard to the spin pole ring.
Step 12: Attach Sheet Line
This step rigs the spinnaker sheet line. See part 7 in parts list.
a) Attach one end of the spinnaker sheet line (part 7) to the clew of the spinnaker sail.
b) Thread the other end of the spin sheet line:
1) over the port pontoon, down the outside of the boat,
2) then through the port stay sheet block,
3) then through the port middle spreader bar sheet block,
4) then through the starboard middle spreader bar sheet block (passing on the stern side of the mast),
5) then through the starboard stay sheet block,
6) then under the wing seat, to the outside of the starboard pontoon,
7) then tie it to the clew of the spinnaker sail (same hole where the other end is tied).
Step 13: Attach Tack Line
This step rigs the spinnaker tack line. See part 5 in parts list.
a) Tie one end of the spinnaker tack line to the tack of the spinnaker sail.
b) Thread the other end of the spin tack line:
1) through the block on the bow end of the spinnaker pole,
2) then through the open half of the block to block set (filled half contains halyard),
c) Pull the tack line until the halyard is taut, then tie the tack line to the metal hoop bracket at the bow (block) end of the spinnaker pole.
SECTION F: SAILING
a) The secret to using the snuffer is to use the halyard to pull the spinnaker into the snuffer. Just give a tug when it hits the snuffer ring. When pulled in with the halyard, it pulls out very nicely.
b) My only disappointment is the "locking" carbo ratchamatic blocks. They will lock in my hand, but even on the lightest setting, I have yet to have these things lock while sailing. IMHO, this kit needs a pair of cam cleats for the spin sheet line.
SECTION G: IMPORTANT UPDATE
After a season of sailing with the Hobie 16 spin on my Getaway, I have a few more thoughts to add on this topic. I plan to update this document this winter with updated text and a few new pictures, but for now here is my short to-do list for these instructions.
a) Add to Section F; Sailing. On a medium to heavy wind, snugly sheet in the main sail. It acts as a backstay and stops the mast from bending too far forward.
b) The spin sail rips really really easily. I put four holes in my new spin in the first few months. I eventually figured out that the rings holding my cotter pins just below my furling reel were poking holes in my spin. I duct taped over everything sharp-ish below my front stay roller furling, down to my front spreader bar. After the duct tape was added in June, I didn't have any more holes in my spin. Luckily, spin sheet repair tape comes in the exact same red as my spin.
c) The spin pole bag/sock is kinda crap. The part that has not been covered by my boat tarp is very faded. And out of the blue, I have a hole in it! This thing should be bullet proof. I am disappointed in the spin bag, but it should last a few years. I have a sexy patch of duct tape over my spin bag hole.
d) Spin pole pre-bend. The spin will pull up on the spin pole. To prepare for this, the front stays of the spin pole should be tight enough to pre-bend the spin pole in a downward direction. Without pre-bend, the spin pole takes on a dangerous up-bend in a medium or heavy wind.
e) Height of spin mast tang is not correct. According to other spin sailors, the luff of the spin should be pulled to a tight straight line when sailing a broad reach. When my spin is pulled up to the mast tang block, my spin luff is not tight. It needs about another 23cm of length, which means that my spin mast tang is too low by about xx cm. Crap!!!
f) Side stay spin sheet blocks. Hmm.... I flew my spin in a medium wind the other day. The side stay spin sheet blocks really bent my side stays at the bottom. That cannot be healthy for my side stays. The location also does not seem to give enough down pull on the spin. I think I might move the block from the side stay to the base of the front outer wing seat pole.
g) Holding the spin sheet by hand is not comfortable. I am considering adding a cam cleat to my side spin blocks somehow.


Comments
Post a Comment